|
USS ESSEX (CV-9)
and AVG-83
Part Four - VT-83
Grumman
TBM-3 Avenger
by Mark Beckwith
|
 |
|
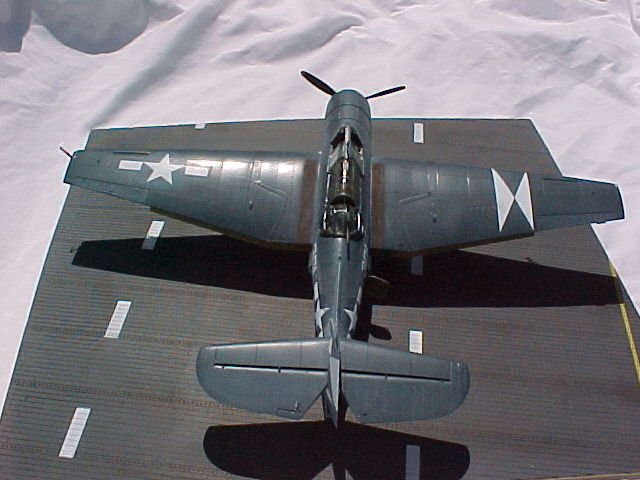
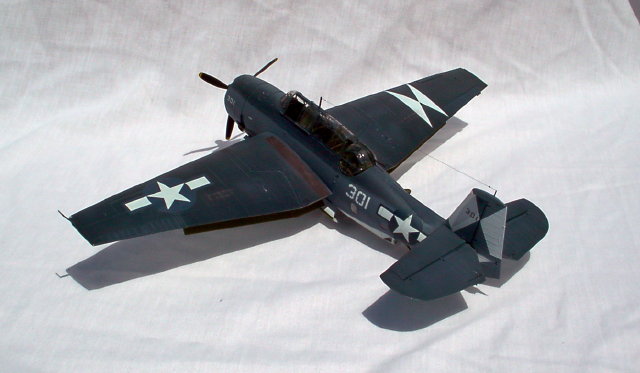
VT-83 Grumman TBM-3
Avenger |

HyperScale is proudly sponsored by Squadron.com
AVG-83
Aircraft Part Four
|
VT-83 Grumman TBM-3
Avenger
The Avenger was Grumman's first
torpedo aircraft, and its design had much in common with that of the Company's
fighters - as its chunky and robust appearance testifies. The design and
engineering team under W.T. Schwendler developed the aircraft very quickly - the
order for two prototypes was placed on 8 April 1940 and the first Avengers went
into service just over two years later.
The new plane first saw action on 4
June 1942 against the Japanese carrier striking force at the Battle of Midway.
The Avenger took part in every carrier-versus-carrier battle and indeed almost
all carrier operations from Midway onwards, working from every fast carrier and
escort carrier of the Pacific Fleet. At Guadalcanal and in subsequent campaigns
it was also active from land bases. For almost all of this time it operated as a
bomber, and as a search and anti-submarine aircraft, rather than as a
torpedo-plane. As a torpedo-plane it was initially hampered by the many serious
defects in the American torpedoes. Moreover the losses inflicted on their
torpedo squadrons at the Battle of Midway left the USN with little confidence in
aerial torpedo attack, confidence which was only regained with the success of
the Avengers at the Battle of the Philippine Sea.
On 7 April 1945, during the Okinawa
operation, Avengers of Task Force 58, including USS Essex, played the main part
in sinking the Yamato, formerly Admiral Yamamoto's flagship - hitting the huge
battleship with ten or more torpedoes.
Avenger
Data
Origin:
Grumman Engineering Corporation - also built by Eastern Aircraft Division
(General Motors)
Type:
Three-seat torpedo-bomber - later versions anti-submarine and AEW (airborne
early-warning)
Dimensions:
Span 54' 2" - Length 40' 0" - Height 16' 5"
Weight:
(TBF-1): 10,100 lb empty, 15,905 lb loaded (TBM-3): 10,545 lb. empty, 18,250
lb loaded .
Engine: One
1,700 hp Wright R-2600-8 or R-2600-20 Double Cyclone two-row radial
Performance
(TBF-1): Max. speed 278 mph; initial climb 1,075 feet per minute; ceiling
23,400 feet; range (loaded) 1,010-1,215 miles
Armament
-
1 x 0.5-inch Browning machine-gun, manually-aimed, in power-operated
dorsal turret
1 x 0.3-inch Browning, manually-aimed, in rear ventral position
('tunnel gun')
1 x 0.3-inch Browning machine-gun, fixed and forward-firing,
in upper front fuselage
Internal fuselage bay for 1 x 21-inch torpedo or
2,000 lb of bombs
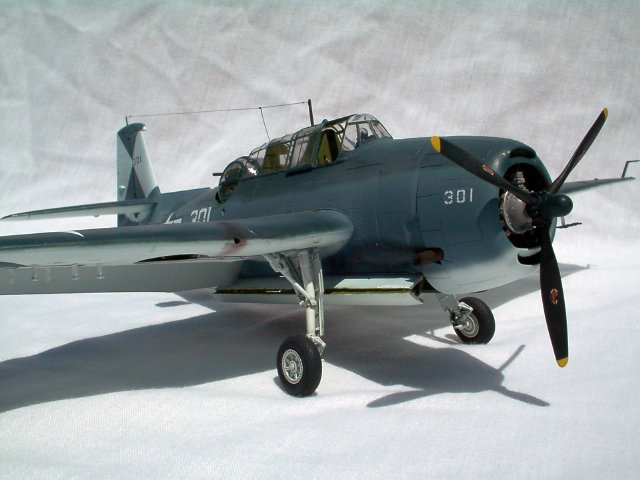
1/48 Accurate Miniatures
TBM-3 Avenger
Construction
The first AM kit I built
was the F3F-4, which had perhaps the best instructions book I've ever come
across in a model kit. The instructions for the TBM were an earlier
evolution! However, as usual the construction begins with the
cockpit. I followed my customary technique described above using MM
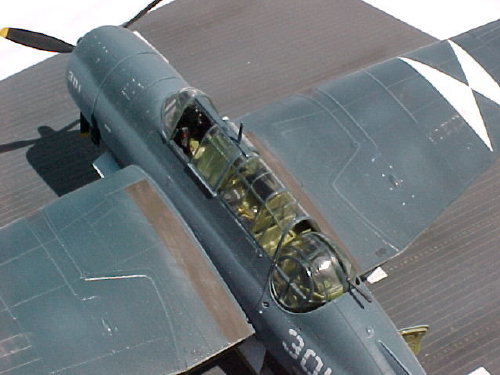
acrylics. The level of detail in this kit is outstanding and I tried to do
it justice. The sheer complexity of the kit meant I spent far longer on
this interior than is usual for me with I would guess almost half the total
construction time spent on the interior. The only major trouble I ran into
was the turret assembly. I followed the written instructions very
carefully, but it took me a couple of attempts to glue the two halves together
satisfactorily. The instructions do say to wait until the glue is fully
set on the assembly before doing this, I think my impatience got the better of
me the first time.
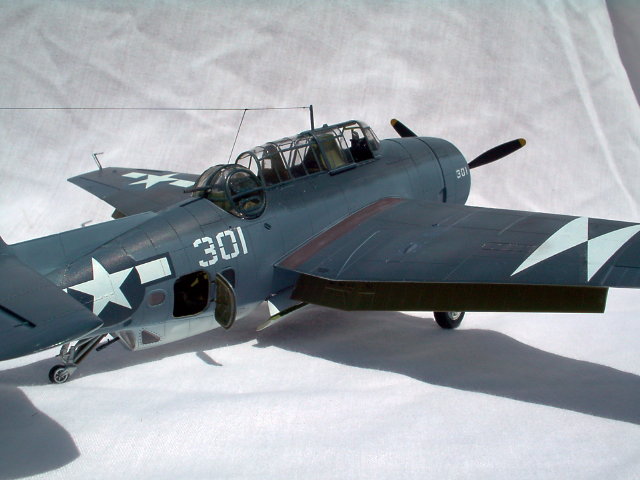
I decided to display the
kit with dropped flaps. To accomplish this I followed the suggestion in
the instructions to scribe the flap panel line with a knife and work them
free. Fairly straight forward. Next I made the filler pieces using
the kit supplied template and inserted them in
the assembled wings. When I had finished this I looked at the interior,
particularly the underside of the upper wing surface and realized I could not
leave it bare and smooth. I made some stringers out of sheet styrene and
glued them to the interior to match the stringers on the flaps. I also
drilled out the filler pieces to make them look more realistic. Of course
the casual viewer will not be able to see all this work unless the model is
picked up, but at least I know it's there!
Other points of note in
the construction phase were that I misaligned the bomb bay in the fuselage half
and ended up with a large gap to fill at the rear end, which I filled with sheet
styrene. In addition to this faux pas I set the horizontal stabilizers at
the wrong angle and had to go back later and remove and reset one. What
else did I screw up? oh yes, the bomb bay doors, but more on that later...
I used some filler on the wing roots, which I finished using the nail polish
remover technique described above. Finally, as usual I masked the
canopies, this time using Eduard EZ Masks. I bought these as an experiment
because all that glass was going to be tedious to mask with tape. I found
them a delight to use, each piece fitted perfectly where it was supposed to go,
the instructions being very clear and simple. I would highly recommend
this set at least, though I have read that other sets may not fit so
well.
Paint & Decals
Essex's VF-83 Avengers were TBM-3's
painted in the Tri Colour scheme. Painting followed the basic steps
described below in the Helldiver section, up to the free hand application of the
dark blue. Try as I might, I could not get a result I was happy
with. After several attempts at touching up to achieve a satisfactory
result, I gave up and resorted to masking with blue tack. The technique is
simple, I roll up a piece of blue tack to a sausage long enough to reach from
one end of the model to the other. I find a "sausage" of about 5mm in
diameter works best. I pressed the blue tack down hard enough to make sure
it won't come off, but making sure that the edge is still rolled over leaving a
slight overhang. This overhang is important, because this is enables the
edge to feather. Still using the Badger 200, I then spray perpendicular to
the blue tack at relatively low pressure at fine adjustment and complete as many
passes as required to get good coverage without wrecking the feathering.
This worked for me well here, and I also used it to touch up an area between the
white and Int. Blue. During all this time I found some of the masks on the
more curved sections of glass began to lift, so watch out for this if you decide
to give them a try.
When I was finally happy with the
paint job, I sealed with Testors Metalizer Sealer to prep for the decals and let
that cure for a day, though it really only needs about an hour or so.
Later, much later (and too late to change it), I learned that TBM's wing leading
edges had a wrap around of Int. Blue, back about a foot onto the upper surface
of the wing. I may yet, but probably won't, go back and fix this error on
mine, so if you plan to do a TBM remember the Int. Blue leading edges, the kit
instructions fail to mention this. From the same source I also learned the
pillar between the pilot and observers' station should have been painted dark
blue, not interior green. With the gloss coat dry, it was time to move on
to the decals.
 I had again intended to use an
Aeromaster sheet, #48-292 Carrier Based Avengers. These worked quite well,
though I had the same problem with the G-Symbols on the fin as I had with the
Helldiver. However, after multiple applications of Micro Sol and some
minor surgery they melted down well and looked good. I had again intended to use an
Aeromaster sheet, #48-292 Carrier Based Avengers. These worked quite well,
though I had the same problem with the G-Symbols on the fin as I had with the
Helldiver. However, after multiple applications of Micro Sol and some
minor surgery they melted down well and looked good.
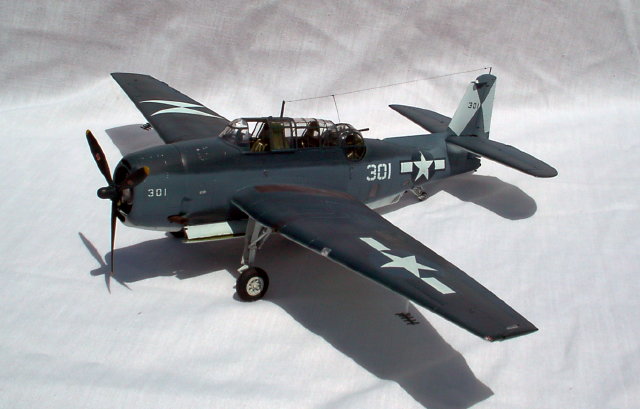
The national insignia
were the right size for the kit, unlike the kit supplied ones, and I experienced
few problems. One are of concern though were the stencils, as is my habit
I planned to apply only a few based on photos, unfortunately of the ones I did
apply, many silvered. Some I was able to repair, others I was not, so I
eventually removed them. At the conclusion of the decaling stage I again
sealed, blended and faded it all with the diluted gray and put the model aside
to fully dry. When dry, I applied dullcoat and put the model aside again
to fully cure. I have to be very methodical with this drying time as I am
impatient by nature and would likely pick up the model too soon and fingerprint
all over it.
Weathering and Conclusion
With most of the work done, all that
remained were the undercarriage, antenna, turret, other bits and pieces, and the
bomb bay doors. Most of these tasks were completed with little trouble,
even the turret which I was quite apprehensive about. The bomb bay doors
were another story. For some reason I completely misunderstood the
instructions and had merely folded them instead of cutting them to display them
open. It took me a very long time to realize this and I could not figure
out why the actuating arms would not fit as shown in the instruction
diagram. Eventually, by studying photos of the real thing, I realized my
mistake and cut the doors apart. With this done everything else fell into
place and the doors, their arms and the fit into the bomb bay itself all worked
well.
Weathering was, as usual, done with
pastels with a little dark gray wash to highlight panel lines around the white
areas and some very minor paint chipping with a silver pencil around the engine
and gun access panels. Paid particular attention to exhaust staining,
using several shades of pastel to try and achieve a realistic look. I
think I succeeded, though it is perhaps a little over done.
This kit was by far the most
challenging for me. I learnt a lot during the build, and feel confident I
could do much better next time. The engineering and design was
exceptional, and provides an opportunity for the modeler to produce an excellent
reproduction of the real thing. I'm not aware of any great inaccuracies in
the kit, so I did not change anything in it. I'd highly recommend this
one.
Navigation to Additional Parts
|
Click the links below to go to the additional Parts of the Reference Feature,
"USS ESSEX (CV-9)
and AVG-83":
Part One - USS Essex History
Part Two - VF-83 Grumman F6F-5 Hellcat
Part Three - VBF-83 Chance Vought F4U-1D
Corsair
Part Four - VT-83 Grumman TBM-3 Avenger
Part Five - VB-83 Curtiss SB2C-4
Helldiver
Text Copyright © 2002 by
Mark Beckwith
Images Copyright © 2002 by Mark Beckwith and Official Sources
as noted
Page Created 06 June, 2002
Last Updated
19 April, 2004
Back to Reference Library
|
 Home |
What's New |
Features |
Gallery |
Reviews |
Reference |
Forum |
Search
Home |
What's New |
Features |
Gallery |
Reviews |
Reference |
Forum |
Search