|
USS ESSEX (CV-9)
and AVG-83
Part Three - VBF-83
Chance Vought F4U-1D Corsair
by Mark Beckwith
|
 |
|
VBF-83 Chance Vought
F4U-1D Corsair |

Tamiya's 1/48 scale F4U-1D Corsair is available online from
Squadron.com
AVG-83
Aircraft Part Three
|
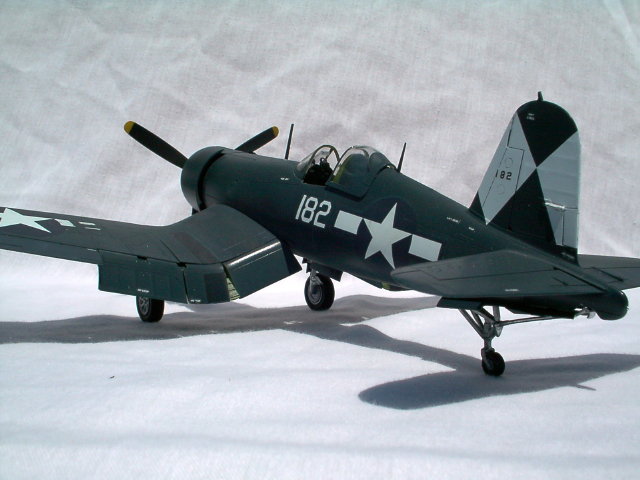
VBF-83 Chance Vought F4U-1D Corsair
The F4U-1D could be described as a
classic case of triumph snatched from the jaws of disaster. Designed by Beisel and Sikorsky, the F4U is
regarded by many as one of the greatest combat aircraft in history, and was in
production for a longer period of time than any US fighter other than the F4
Phantom. As conceived it was intended to mount the most powerful engine, and
biggest propeller, of any fighter in existence, and the prototype was the first
US combat aircraft to exceed 400mph. This was the reason for the bent
wing, to mount the large prop the main undercarriage had to be very long to give
adequate ground clearance for the propeller. However, this meant the 'gear
would be too long to fold into the wings. The solution was to use an
inverted gull wing to achieve ground clearance for the prop and keep the main
undercarriage legs from having to be too long.
There were still problems
though. The extraordinarily long nose inflicted poor visibility for the
pilot when landing and take off. The undercarriage, though
shortened, occasionally broke and the Corsair had a strong tendency to bounce on
landing. All these faults were greatly exaggerated when the aircraft was
operating from carriers. As a result the US Navy at first rejected it for
shipboard operation. Nonetheless the F4U was adopted by the Marine Corps and
quickly demonstrated its effectiveness.
The US Navy finally adopted the
F4U as a shipboard fighter-bomber in November 1944, and by early 1945 large
numbers were operating from the fast carriers of the Pacific Fleet - although
the longer-established and very capable Grumman F6F Hellcat remained somewhat
more numerous aboard the carriers right up to the war's end.
The F4U-1D is basically a follow on
to the very successful F4U-1A version. There are some interesting differences
between the two though. For one thing, the -1D was the first type to be used
regularly from aircraft carriers. Externally, they can be told apart by the twin
racks between the gear legs. These racks could hold either drop tanks or bombs.
The -1D was also able to carry underwing rockets that the -1A could not. Most
-1Ds had no extra framing in the canopy.
Corsair
Data
Origin:
Chance Vought Division of United Aircraft Corporation (also built by Brewster
and Goodyear)
Type:
Single-seat carrier-based fighter-bomber
Dimensions:
Span 41' (12.48 metres) British version 39' 7"
Length 33' 8" - 34' 6"
according to version
Engine
(F4U-1) 2,000 hp Pratt & Whitney R-2800-8 (B) Double
Wasp 18-cylinder two-row radial
(F4U-1A) 2,250 hp R-2800-8 (W) with water
injection
Maximum
Speed (F4U-1A) 395 mph (F4U-5) 462 mph
Initial
Climb (F4U-1A) 2,890 feet per minute
Service
Ceiling F4U-1A) 37,000 feet
Range (on
internal fuel): 1,000 miles (1,609 kilometres)
Armament -
Guns
(early versions) 6 x 0.5" Browning MG53-2 machine-guns in outer
wings, with 390 rounds per gun
(F4U-1C onwards) 4 x 20mm. cannon in wings
Armament -
Bombs/Rockets
(F4U-1D and most subsequent versions) 2 x 1,000 lb bombs or
8 x 5-inch rockets under wings
1/48 Tamiya F4U-1D Corsair
Construction
I cannot say why (because I don't
know), but this was the least enjoyable build for me. Construction was
straight forward with no real problems, though the wings are awkward to do well
if not displayed folded.
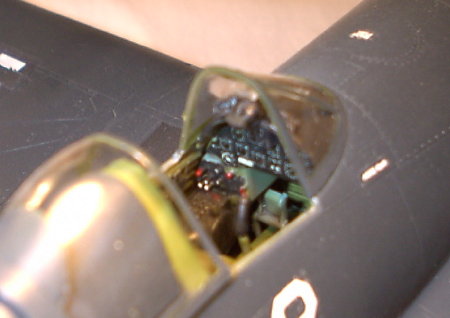 I did the cockpit in the usual way, it is very well done and looks
quite convincing when complete. Just for a change, I used the supplied
decal for the instrument panel, using lots of Micro Sol to get it to melt down
well. When it was dry, I dropped in a little Future to simulate the
glass. I did the cockpit in the usual way, it is very well done and looks
quite convincing when complete. Just for a change, I used the supplied
decal for the instrument panel, using lots of Micro Sol to get it to melt down
well. When it was dry, I dropped in a little Future to simulate the
glass.
The only work to do to make this a
1-D is to remove a small air scoop on the forward cowl. The aircraft I was
representing had both ariel posts so the positioning hole was cut for the dorsal
one before joining the fuselage halves. The kit is so well designed that
apart from acknowledging the fact, there is very little to say about
construction.
For general information that also
applies to the other kits, I generally use Tenax R for construction, with
occasional use of tube glue for larger pieces and CA for items that need a quick
join.
Paint & Decals
As is the case with Essex's VF-83
Hellcats, the VBF-83 Corsairs were all 1-D's painted in GSB. Again, I had
a particular plane in mind that Scott Taylor had sent me some scans of that had
a strange markings on the wings, however more on that later. After masking
the canopy with Tamiya tape, I used MM gloss acrylic for the GSB, the idea being
that a gloss coat should require less gloss coat in preparation for
decaling. This theory worked to a large extent, though I did experience
some silvering with the smaller stencil decals. Painting went very well, I
used the Badger 200 single action to lay down several light coats to build up an
even, solid finish. I left it to cure for a couple of days before sealing
with Metalizer sealer. I then masked the G-Symbols and painted them.
I sealed the GSB before masking to try and ensure no paint would lift and this
seemed to work very well. I had no lifting at all, and the tape seemed to
adhere better to the hard glossy surface of the Metalizer sealer than it would
have to bare paint. After the white was dry I sealed that and left the kit
to cure for a day or two.
With the kit fully cured, it
was time to start decaling. I made the code numbers with dry transfers on
clear decal sheet and applied them after I'd placed the national insignia in the
appropriate locations. I used the kit deals for these. As is my
usual practice, I only applied the stencil decals sparingly and after the first
couple silvered, I used a little Future under the rest and experienced no more
problems.
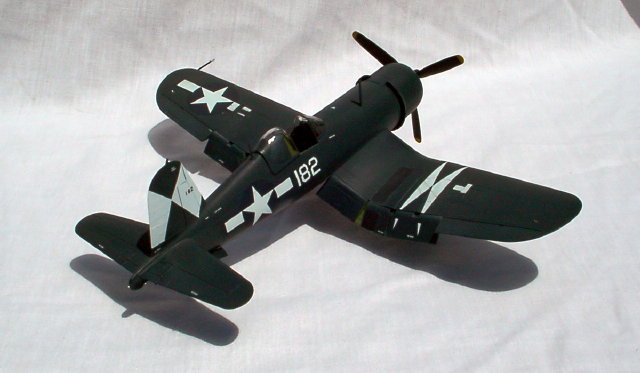
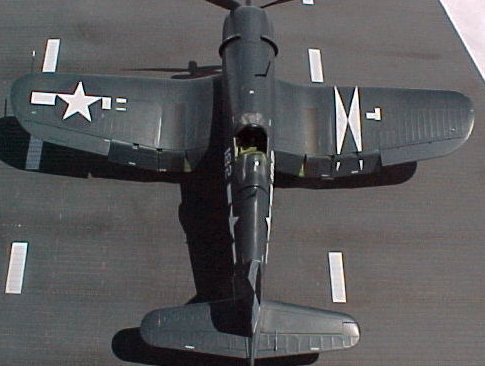 A note
of explanation is now required. The pictures of my subject showed the
national insignia on the port wing to have some gaps in it, with what looked
like the corresponding "pieces" on the starboard wing. My guess is that a
couple of the maintenance panels had been swapped from one wing to the other
which would explain the unusual markings. I am unsure as to the copyright
status of the pictures I have and so am unable to include them in this piece,
you'll have to take my word for it that the markings in the picture to the left
are a reasonably accurate reproduction! A note
of explanation is now required. The pictures of my subject showed the
national insignia on the port wing to have some gaps in it, with what looked
like the corresponding "pieces" on the starboard wing. My guess is that a
couple of the maintenance panels had been swapped from one wing to the other
which would explain the unusual markings. I am unsure as to the copyright
status of the pictures I have and so am unable to include them in this piece,
you'll have to take my word for it that the markings in the picture to the left
are a reasonably accurate reproduction!
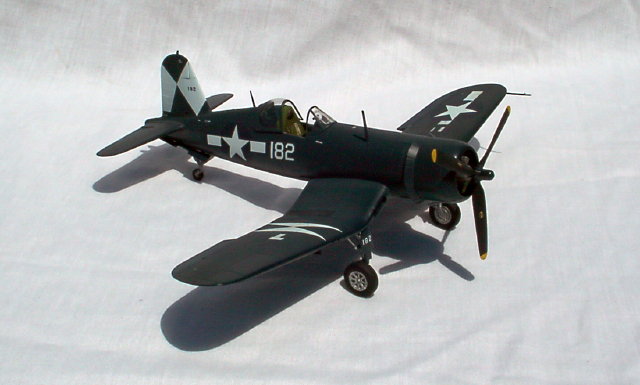
With all the markings applied, all
that was left was the fade coat, applied as described elsewhere and a final seal
of Dullcoat. I brought the finish down to a semi gloss to simulate some
degree of sun bleaching as I had for the other models. The picture to the
left shows that in sunlight the sheen appears quite realistic - to me in any
case.
Weathering and Conclusion
Onto the final stages. I added
the previously painted flaps, ariel posts, the undercarriage which I had painted
with Tamiya flat aluminum acrylic, all without much problem. I had painted
the gear covers while painting the kit, both sides GSB. Weathering was
kept to a minimum as usual, all done with pastel chalks except for a wash of
dirty thinner on the undercarriage legs to bring out the detail. With that
done, I used stretched sprue for the ariel wire, which looked quite good until I
knocked it off while taking these pictures. I've redone the wire but
didn't redo the pictures.
In my opinion this is a great
kit. As I started of this section by saying, I don't know why I didn't
particularly enjoy the build but I'm sure it had something to do with this one
being the last to be built of the group and a certain amount of burn out
occurring. I would highly recommend the kit to all but the most
inexperienced, and I think even a complete beginner isn't going to have too much
trouble with it.
Navigation to Additional Parts
|
Click the links below to go to the additional Parts of the Reference Feature,
"USS ESSEX (CV-9)
and AVG-83":
Part One - USS Essex History
Part Two - VF-83 Grumman F6F-5 Hellcat
Part Three - VBF-83 Chance Vought F4U-1D
Corsair
Part Four - VT-83 Grumman TBM-3 Avenger
Part Five - VB-83 Curtiss SB2C-4
Helldiver
Text Copyright © 2002 by
Mark Beckwith
Images Copyright © 2002 by Mark Beckwith and Official Sources
as noted
Page Created 06 June, 2002
Last Updated
19 April, 2004
Back to Reference Library
|
 Home |
What's New |
Features |
Gallery |
Reviews |
Reference |
Forum |
Search
Home |
What's New |
Features |
Gallery |
Reviews |
Reference |
Forum |
Search