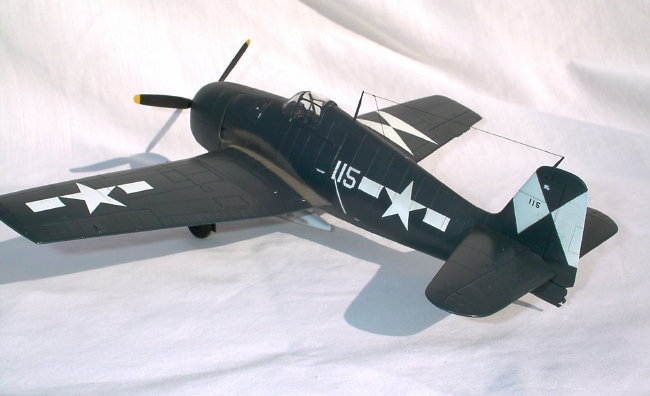
VF-83 Grumman F6F-5
Hellcat
Easy to fly, easy to maintain, well
armed, tough and easy to build - could a better specification of a carrier borne
fighter be written? Grumman's F6F Hellcat achieved the highest kill ration there
will ever likely to be for a combat aircraft at 19:1 and produced 307 American
Aces during World War 2.
Designed in late 1941 to replace
Grumman's outclassed F4F Wildcat, some of the design specifications were
influenced by the A6Ms that were captured during the early months of the war,
especially its excellent maneuverability. As a result of this experience of
combat against higher-performance machines the Hellcat's specification required
the most powerful engine available. The prototype X6F-1 was provided with a
1700hp Wright R-2600 engine, but a month later - on 26 June1942 - it was
re-engined with a 2000hp Pratt and Whitney R-2800. The US Navy was so confident
in the design that it was ordered into production before the prototype flew.
A total of 2,545 Hellcats were
delivered in 1943, in 1944 no fewer than 6,139, and in 1945 a further 3,578 -
total production was 12,272 units. The Hellcat was eventually credited with
destroying more than 6,000 Japanese aircraft - 4,947 of these by F6Fs of the USN
carrier squadrons (209 of the others by land-based Marine Corps F6Fs, and the
remainder by Hellcats of other Allied countries).
Hellcat
Data
Origin:
Grumman Aircraft Engineering Corporation
Type:
Single-seat shipborne fighter - also fighter-bomber and night fighter
Dimensions: Span
42' 10" (13.05 metres) - Length 33' 7" (10.2 metres) - Height 13' 1" (3.99
metres)
Weight
(F6F-3): Empty 9,042 lb (4,101 kg) / Loaded (clean) 12,186 lb (5,528
kg) / Loaded (maximum) 14,250 lb (6,443 kg)
Engine:
2,200 hp
R-2800-10W (water-injection rating)
Armament:
6 x 0.5 inch Browning machine-guns with 400
rounds per gun
(Some F6F-5 and F6F-5N Hellcats had 2 x 20 mm cannon plus 4 x
0.5 inch machine-guns)
Underwing attachments for six
rockets
Centre-section pylons for up to 2,000 lbs of bombs
Performance:
Maximum speed (clean) 376 mph
Initial
climb (typical) 3,240 feet per minute
Service ceiling 37,500 feet
Range
1,090 miles
1/48 Hasegawa F6F-5
Hellcat
Construction
Built basically OOB with some minor
scratch built additions to the cockpit. I began with the cockpit, painted
with Model Master Interior Green. On this one I used masking tape for the
seat belts. I painted the instrument consol in my usual way. Started with
black, which I then dry brush with RLM74. When that's dry I use a silver
pencil to pick out the details. I then paint the individual instruments
with a very fine brush - usually using a photo of the real thing as my
guide. Finally, I drop in some neat Future to each instrument dial to
simulate the glass. After final assembly of the cockpit components, I put
in a light wash to help give it that "lived in" look.
Construction then continues per the
standard Hasegawa steps. I didn't deviate too much from the instructions,
just leaving off all the breakable bits until I couldn't avoid adding
them. As I recall, the only place I needed filler was the wing
roots. I used the Testors Green putty, which I applied with my #11 blade
and then immediately wiped with a Q-Tip moistened with nail polish
remover. Masking was a snap, on this one I used Tamiya tape for the canopy
and Parafilm M for the windshield.
Paint &
Decals.
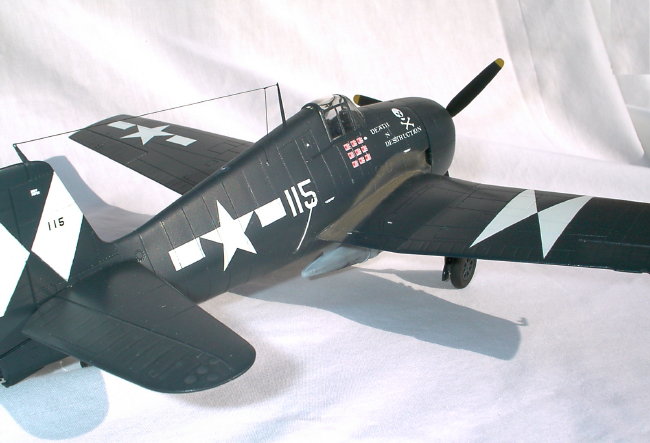
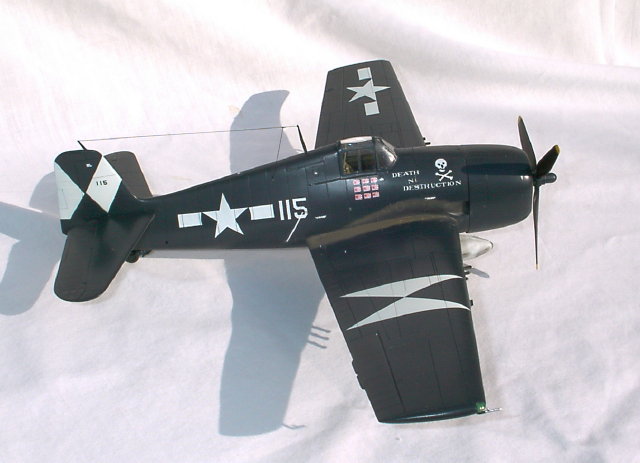
Essex's VF-83 Hellcats were all -5's
painted in GSB. I had a particular plane in mind which appears on page 69
of Barret Tillman's "Hellcat Aces of WW2". This particular aircraft
was one of a very few to carry nose art. It was flown by three Ensigns,
Donald McPherson, Bill Kingston, Jr, and Lyttleton Ward, the latter shooting
down 4 enemy aircraft on May 4, 1945, and becoming an ace in the
process.
GSB is a fairly simple
scheme to paint! I used Model Master acrylic sprayed through my Badger 200
and left it to dry. When it was well cured (which doesn't take long with
MM acrylics) I masked of the G-Symbols on the tail and wings with Tamiya
tape. This took some time to get right, but when I was happy I sprayed MM
Insignia White in several light coats. I removed the masking as soon as I
felt it safe to do so because I was concerned about lifting the GSB
underneath. The only drawback with acrylics being that they don't stick to
the plastic as well as enamels. This time all was okay and when the white
was cured I sealed the paint with Metalizer Sealer. I use this because,
although it's smelly, it gives a very hard, quick drying and smooth gloss coat
in preparation for decaling.
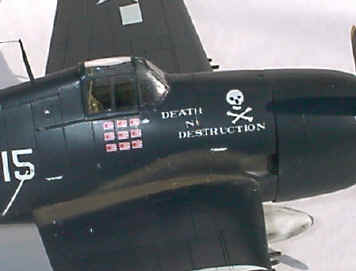 I used kit decals for the
nation insignia, kill markings and stencils, the latter of which I applied
sparingly as there never seems to be as many visible in photos than kit
manufacturers supply. Codes were easy, I use dry transfers onto clear
decal sheet for these. My real problem was the skull and cross bones and
the phrase "Death n' Destruction". I solved the wording with more dry
transfers made for the model railroad hobbyists but the graphics stumped me for
a little while. I eventually settled for cutting out the skull from
white decal sheet and painting the mouth and eyes by hand. I also hand
painted the crossed bones. I was fairly happy with the result, though it
is quite a bit larger in scale than the real aircraft's.
I used kit decals for the
nation insignia, kill markings and stencils, the latter of which I applied
sparingly as there never seems to be as many visible in photos than kit
manufacturers supply. Codes were easy, I use dry transfers onto clear
decal sheet for these. My real problem was the skull and cross bones and
the phrase "Death n' Destruction". I solved the wording with more dry
transfers made for the model railroad hobbyists but the graphics stumped me for
a little while. I eventually settled for cutting out the skull from
white decal sheet and painting the mouth and eyes by hand. I also hand
painted the crossed bones. I was fairly happy with the result, though it
is quite a bit larger in scale than the real aircraft's.
Once decaling was complete, I sealed
the entire model with an overspray of very diluted light aircraft gray. I
do this to begin the weathering and to homogenize the markings with the
paint. On this plane, it was depicted as it was three months into its
tour, so I felt a moderate level of paint fading would have occurred, so I faded
the upper surfaces lightly. I was careful to try and only fade those areas
that would have received direct sunlight with the wings folded. With the
fading done, I sealed it all with several light coats of dullcoat, brining the
finish down to semi sheen.
 With most of the work done, I brought it back to the bench to add on
the fiddly bits, and realized I'd lost the tail wheel. Digging in the
spares box I found a suitable wheel and then scratch built the rest of the
structure out of styrene sheet and tube. It came out okay, but I think I
should have made the strut a little longer. I added the undercarriage,
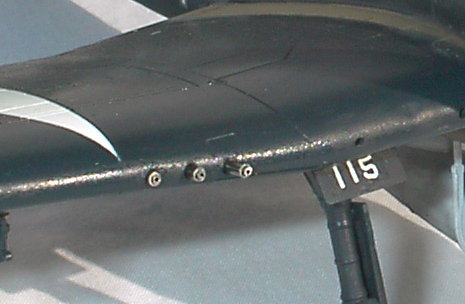
antenna, etc. I decided to use hypodermic needles for the gun
barrels. Working from photos I used two different sizes, placed the small
inside the large and cut to length. I also burnt the needles in a candle
flame to try and blue them up a little, came out okay.
With most of the work done, I brought it back to the bench to add on
the fiddly bits, and realized I'd lost the tail wheel. Digging in the
spares box I found a suitable wheel and then scratch built the rest of the
structure out of styrene sheet and tube. It came out okay, but I think I
should have made the strut a little longer. I added the undercarriage,
antenna, etc. I decided to use hypodermic needles for the gun
barrels. Working from photos I used two different sizes, placed the small
inside the large and cut to length. I also burnt the needles in a candle
flame to try and blue them up a little, came out okay.
Weathering and
Conclusion.
Weathering was done entirely with
pastels except for some panel line highlighting through the white portions of
the markings. I used pastels to dirty up the fuel tank (I still don't
think I got it dirty enough) and for the exhaust staining. I worked from
photos and I must say I was surprised at the level of staining on these
airplanes. I think I got it fairly close, but again, if anything I think I
may have underdone it. In photos I see little evidence of paint chipping
so I kept mine down to a bare minimum.
With most of the work done, all that
was required was to add the antenna wire. Of course, I had to replace the
broken post on the tail fin first, which I did with sheet styrene. I used
stretched sprue for the antenna wire which was positioned without [too] much
trouble.
In conclusion I say that
this is a fine kit. I am aware of its two main failings, those being the
"smile" in the cowl's shape being off, and the irritation of the canopy
not fitting in the open position. The cowl I just accepted. The
canopy, well I had started with the intention of building it strictly OOB, so I
didn't bother to get myself a vacformed replacement. As things worked out,
other things I did disqualifies it from OOB so I think one day I'll probably get
around to installing a vacform on this one.
 Home |
What's New |
Features |
Gallery |
Reviews |
Reference |
Forum |
Search
Home |
What's New |
Features |
Gallery |
Reviews |
Reference |
Forum |
Search