Home |
What's New |
Features |
Gallery |
Reviews |
Reference |
Forum |
Search
Home |
What's New |
Features |
Gallery |
Reviews |
Reference |
Forum |
Search
|
|
|
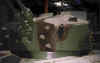
Crusader III A.A. Mk III at Saumur by
Peter Hartup
The Crusader Cruiser Tank was a contemporary of the disastrous Covenator, and the immediate ancestor of the much improved Cromwell. The Mark III was the final development of the Crusader as a gun tank. It featured a 6-pdr (57mm) main gun in a longer and higher turret. The benefit of the more powerful gun was partially offset by the need for additional stowage, and therefore fewer crew. The Mark III crew was reduced from 5 in the earlier versions to only three. The Commander of the Crusader III doubled as the loader, and the gunner was also the radio operator.
The Crusader III was initially welcomed by British armoured units in North Africa. It was fast and its 6-pdr gun helped to counter superior German armour. However, mechanical problems plagued the Crusader and it was declared obsolete by the end of the North African campaign. The Anti-Aircraft versions of the Crusader were developed in response to the perceived need to counter German "tank-busting" ground attack aircraft. The first design using one Bofors 40mm anti-aircraft gun on a Crusader III chassis was unsophisticated in design and unsuccessful in application. The Crusader III A.A. Mk II was an improved design with an enclosed turret and twin 20mm Oerlikon cannon capable of firing explosive, incendiary or practice rounds at up to 450 rounds per minute. The main limitation was, once again, crew accommodation. The Crusader III A.A. Mk III was the final version. It addressed the cramped crew conditions by adding a raised coaming at the rear of the turret. Crusader AA II and III vehicles were used in front line duties with British and Polish armoured units after D-Day. However, due to the effective air cover by the RAF they only saw limited action.
Italeri produced a 1/35 scale kit of the Crusader III some years ago. It was also
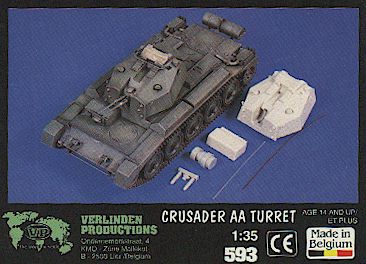
released under the Tomy label. The Airfix produced a 1/32 scale Crusader as well, although this is rarely seen today. Verlinden stock number 593 is a Crusader III A.A. Mk II turret. This resin conversion is simple in the extreme. The six resin parts are free of holes or blemishes. With the addition of the high rear coaming and Vickers "K" mount, plus some modifications to the gun mount, the Verlinden turret could be converted to Mk III specifications.
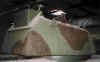
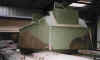
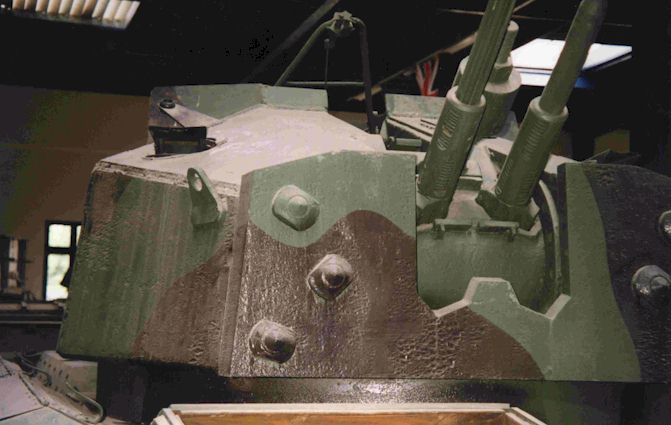
The pictures below illustrate the other three views of the horizontal surfaces of the Crusader III A.A. Mk III Anti-Aircraft turret. The high coaming at the rear of the turret is the most noticeable difference between this Mk III and the earlier Mk II A.A. turrets. The Mk. III carried a single Vickers K (.303) machine gun. The mount for this gun can best be seen at the top of the title photograph at the top of the page. The Mk III also featured a modified pivot-mount for the twin 20mm Oerlikon cannon, and a revised front turret armour pattern. Note the heavy surface pitting, the torch-cut marks, weld marks and large attachment points for the appliqué armour on the front of the turret. These attachment points were common to a variety of vehicles including the Cromwell. Peter took these photographs at Saumur Armour Museum in France. This amazing Museum is the world's biggest collection of armour, with over 700 items on display and in storage. Click on the thumbnails below to see the full sized image. To return to this page click the "Return" arrow on your browser.
Photographs Copyright 1998 by Peter
Hartup
|

 Italeri Crusader was
a very nicely detailed kit - one of their better offerings. Considering Italeri's
re-release strategy we might hope that this kit will be available again soon.
Italeri Crusader was
a very nicely detailed kit - one of their better offerings. Considering Italeri's
re-release strategy we might hope that this kit will be available again soon.