Home |
What's New |
Features |
Gallery |
Reviews |
Reference |
Forum |
Search
Home |
What's New |
Features |
Gallery |
Reviews |
Reference |
Forum |
Search
|
|
|
Tips and Techniques Preshading by Russell M. Field
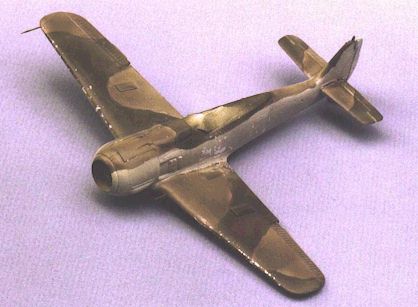
Preshading is often discussed on HyperScale. I've been experimenting with this painting technique and thought that some of you might be interested in seeing how it's working for me. Preshading emphasizes panel outlines after primer is applied, but before final painting. It is generally seen as an alternative to fading panel interiors and washing panel lines after application of the primary color coats. Properly done, it can give nice effects, but if overdone it can give a model a toy-like appearance. This article illustrates the airbrush approach I took on a particular model. The subject is a 1/72 Revell Germany Fw 190A8/F8 with the BV 246 Hagelkorn glide bomb; this is the same subject that received the wheel well rebuild in a previous article, so we're really kind of tracing the story of building this little thing! Apologies in advance: I'm still refining my photographic skills, and the color mix in some of the accompanying pictures isn't perfect. However, this won't interfere with illustrating the process or results.
From my perspective, there are three major considerations in preshading:
Color Selection This relates to both primer and the "emphasizer" colors. Choices will be influenced by the final color scheme. Stark contrast between primer and emphasizer colors will show dramatically under light-colored topcoats, but more subtly under darker topcoats. The final camo scheme was to be RLM 74 Graugrun/RLM 75 Grauviolett over RLM 76 Lichtblau; I chose white primer overall to help with scale effect, black emphasis for the top and a lighter rust-colored emphasis on the underside for less contrast under the lighter RLM 76.
Degree of Coverage This relates to how many and which panel lines will be emphasized. In 1/72, I find it easier and more effective to highlight areas rather than each individual panel line; I do this by focusing on major panel lines that define the general outline and contour of the subject.
Application Approach The most common approach I've seen involves airbrushing panel lines at roughly a 90-degree angle to the surface, parallel with the line. This provides emphasis on both sides of the line. The approach illustrated here involves holding an index card (or other barrier) along the leading-edge side of the selected line. The airbrush is held at about a 45-degree angle, pointed aft across the line and sprayed half or more on the card, letting the spray fade off onto the model surface. This emphasizes only the aft or inner side of a panel line, producing a different shading effect than the 90-degree application.
"Ya pays your money, ya takes your choices!" One particular caution: you must apply overcoats LIGHTLY to avoid obliterating the preshading effect. I've done this more than once (OVERdone it, I mean) and lost the effect I was trying for. This time I used a 1:1 ratio of paint to isopropyl alcohol, which may have been just a tad too thin, but it gave me decent control. Also of interest is the fact that between the white primer and the thinned paint, I didn't feel I needed to lighten the paint at all for scale effect. It's best to mist a topcoat color and look at it under different kinds of light to check the OVERALL effect. If subtlety is your goal, you should focus on the general, overall impression created. I masked and applied the two topside colors separately - rather than painting one over the other - to avoid multi-layer paint buildup over the preshading. On this particular model, the Grauviolett misted over white primer might be just a little too light.
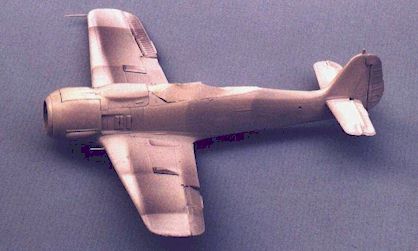
After addressing the considerations noted above, the first step is to prepare the model for priming. This one unfortunately has a previously applied coat of a different primer, hence the gray color.
You'll see the canopy is not installed. I never put on the canopy until the last operation; that's just the way I do it! Note the areas with BareMetal Foil applied; these areas will be scraped and chipped later to simulate operational nicks and wear (another experiment). On the underside, I use the landing gear covers to help mask the wheel wells. This allows me apply exactly the same treatment to the covers as the rest of the underside will receive (and guarantees I won't forget to do them … anybody ever had to recreate that exact shade of "dirt" after dumping the mixture 'cause you thought you were done?).
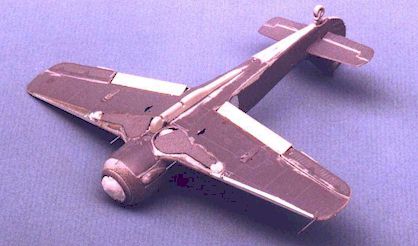
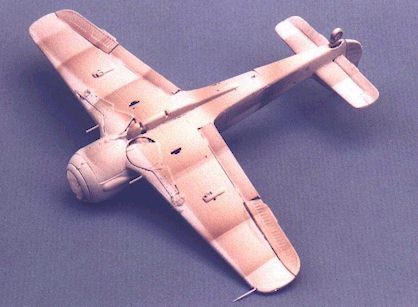
Here we see the plane primed and with the upper and lower emphasis applied. Now we can clearly see the difference in contrast between the two color combinations; the top is more harsh, but this will help it show under the darker top colors. These pictures also illustrate well the effect achieved by blocking part of the spray and angling the airbrush aft and inboard. This is a noticeably different appearance than the 90 degree, "both sides of the line" approach. Next we see the underside with the RLM 76 applied. Again, please excuse and ignore the poor color mix of the photograph; focus instead on the vague demarcations created by the underlying emphasis color. The RLM 76 is applied up the sides as well (see the picture at the top of the article).
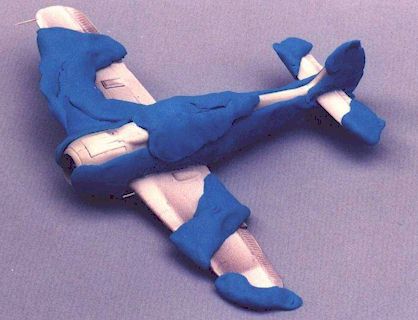
Now we prepare the upper surfaces for the two-tone camo pattern. We'll mask for application of the lighter color (RLM 75) first; the masks protecting the fuselage sides will stay on through the application of both colors. The Play-Doh masks are easy to form and apply (thanks again to John Greiner for the tip). You may want to make them somewhat thinner than you see here (I will next time). Be sure NOT to press the edges down to the surface, otherwise you'll get a sharper line between the colors, and that's what you DON'T want!
When the first color is misted on to your satisfaction, let it dry thoroughly and then use the mask material to cover the painted areas (leave the protective masks on the fuselage sides, though). If the Play-Doh has dried out some, just add a few drops of water and massage it back to original consistency. MAKE SURE that the rearranged masks actually expose a tiny edge of the previously painted color; otherwise you'll end up with small, EXTREMELY NOTICEABLE (remember the white primer?) gaps between the colors (guess what happened to me …).
The Pay-Off Here's the main upper camouflage applied (the mottling came next, and that's a whole 'nother story!).
The extreme contrast between the white primer and black emphasis shading is distinct enough to show through, but is softened by the darker overcoats. To my eye, at least, it provides more of an overall impression than a detailed effect (if that makes any sense). You'll notice also that the fresh paint has been scuffed and chipped to reveal part of the BareMetal Foil beneath, both on the wing leading edges and around the cockpit access area. I was not entirely pleased with this, and some touch-up has ensued - but again, that's another story! For what it's worth, this entire progression took place in somewhat under three hours, starting with the model prepped for priming.
I want to thank all those Hyperscalers who have contributed their time and knowledge to describing these processes; I'm hoping to pay back some small measure of that through articles like this. Any and all advice and comments are welcomed! Next challenge: "Mottling"!!
Models, Photography and Article Copyright © 1999 by Russell
M. Field Back to HyperScale Main Page Back to Reference Library
|