Natural metal finishes (NMF) are typically
avoided by most modelers. But the reality is that new paint
technology has made these finishes much easier than in the
past—and in fact, I’m coming to believe that NMF may in fact be
easier and faster than traditional camouflage schemes. I can
typically build, paint, and decal a NMF aircraft in 3-4 days,
working about 2-3 hours total a day. So take heart and tackle
that shiny jet from the 1950s!
NMF show all flaws and
imperfections.
There are tricks you can use to minimize
the preparation time (which I will discuss below), but the most
important thing for your first effort is to start with a good
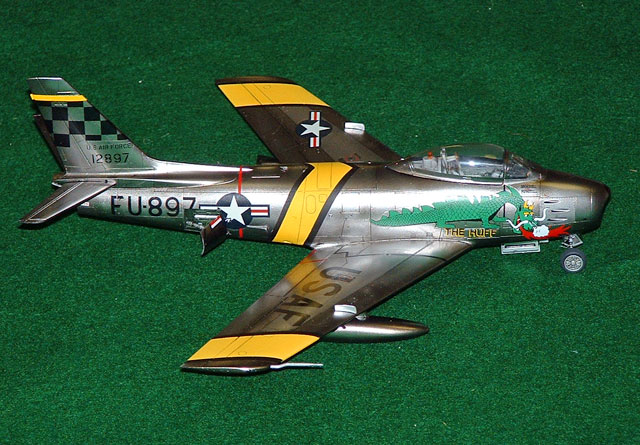
kit with recessed panel lines. For example, in 1/48th
scale, the Revell/Monogram F-86D is a reasonably-priced kit that
fits great, as is the Tamiya F-84E or P-47. Basically, start
with a good kit and you don’t need to spend as much time sanding
and polishing. After you’ve got a little experience under your
belt, you can try doing that natural metal Monogram B-58 Hustler
that needs to be completely scribed!
Also, the important thing is to try this
and not achieve NMF nirvana on your first attempt. The key
thing is to accept some flaws here and there—and I think you
will find in the end that most other people really can’t see
them. So avoid advanced modeling syndrome!
With a good kit, you can really minimize
the amount of seam filling you need to do. For example, I’ve
built the Tamiya P-47 (a truly outstanding kit) without using
any filler at all.
When dealing with seams, I use sanding
sticks (either purchased or made from basswood covered with
wet-dry standpaper). You must back the sandpaper or you will
create dips in the plastic through uneven pressure (which will
show up when you apply the natural metal finish). I always wet
sand to take away the grit and avoid clogging the sandpaper.
I spend time dry fitting and sanding where
necessary. Basically, time spent here saves lots of time
later. I will often flat sand the mating surfaces of two parts
(say fuselage halves or drop tanks) to ensure that I get a solid
joint.
I assemble my models using Ambroid ProWeld
or Tenax 7R liquid glue. These glues dry very quickly. I will
fit, for example, two fuselage halves together, brush the glue
on, and then squeeze. Plastic melted between the two halves
squeezes out. After this is dry (typically about 5 minutes), I
then sand off the excess using a sanding stick with 220 grit,
followed by 400 grit.
After I have the whole model assembled and
the seams sanded, I will brush on each of the seams a coat of
Tamiya flat aluminum, which dries in a matter of minutes. This
highlights any flaws. If I spot a problem area, I use a
toothpick to apply some gap filling superglue, which I then
brush with accelerator. As soon as it is hard (10 seconds), I
sand off the excess. If you wait more than an hour, the
superglue goes very hard and is more difficult to remove. With
a good kit, you should be able to assemble and finish the seams
in an hour or so.
You can use putty if you insist with Alclad
II or Floquil. It does not work with Testor’s Metalizer and SNJ.
With these products, the only filler you can use is superglue.
One key thing is to take advantage of
natural seams to minimize the amount of filling you need to do.
For example, at a wing root (assuming I have a good fit), I will
just brush on the liquid glue (but not apply any pressure, since
that would cause plastic to squirt out). If I have to apply,
say, a nose to a fuselage, I will double check the fit, take off
the edge off the nose and the fuselage joint by scraping the
corner of each surface with a hobby knife (so that it looks like
a panel line—see Figure 1), and then hold the two pieces gently
together and apply the glue. Again, you don’t want to apply
pressure or you will fill in the seam—and then have to scribe it
out. For scribing, I use my X-acto knife or my Bare-metal
scribing tool.
Figure 2: Creating a panel
line:

|
Options for Creating a Natural Metal Finish |
I am first going to take you through the
steps of my recommended approach using the latest paints (Alclad
II), since I think this is the easiest and best approach. But I
have tried every technique under the sun and will discuss the
others later—I often combine all of these options in one model
to achieve a truly variated metal surface.
All of the paints used are highly toxic and
must be sprayed using an airbrush. To clean up the airbrush, I
use laquer thinner, which is also highly toxic. You really need
to use a spray booth when shooting these paints (and/or wear a
mask and work in a well ventilated area)—otherwise you will put
your health at risk
Alclad II
Wet sand the seams with 600 grit wet-dry
sandpaper. Wipe off the residue and prepare the model for
painting. Shoot a coat of primer over the entire model and
subassemblies. One of the key advantages of Alclad is that you
can use a primer; with the other metal finish paints, you can
only apply to bare polished plastic. Primer is your friend,
since it fills in lots of those minor flaws and scratches that
otherwise would be highlighted by the silver finish.
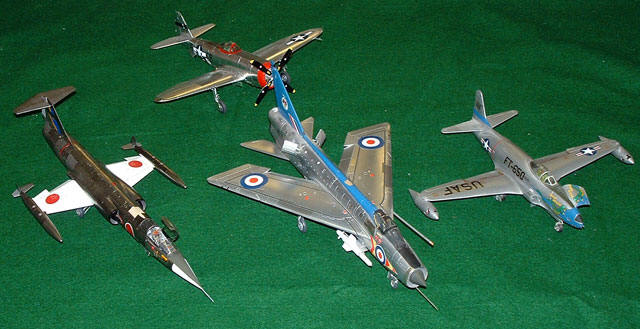
Figure 3:
Examples of the four NMF alternatives in 1/48th
scale. The F-80 was done about 20 years ago using Floquil
Platinum Mist. The Lightning was finished using SNJ metalizer
and Testor’s Metalizer. The P-47 was covered with Bare metal
foil (lots of work). The F-104 was finished using Alclad II
Chrome as the base and other Alclad II and Metalizer shades for
the individual panels.
I typically use Floquil grey primer, but
more recently have been using Gunze Sanyo Mr. Surfacer or Alclad
Grey Primer. The advantage of the Alclad primer is that it is
laquer based and dries very very quickly. So instead of having
to wait a few hours (or overnight), you can fix flaws and then
reprime.
When the primer is dry, inspect the model
closely. Use the 600 grit wet and dry to do touch ups. Use the
superglue with accelerator on areas that need filling and sand
as necessary. Then reprime and let dry.
I usually then give the model and
subassemblies a light wet sanding with 1800 grit from my paint
polishing kit—you can get these sanding pads (item number 81601
soft touch pad set) from the Micro-Mark web site. When cleaned
up, spray the entire model and subassemblies with Tamiya Gloss
Black acrylic paint (X-1). Yes, this is correct: gloss black.
To get a good glossy finish, I thin the Tamiya paint with
rubbing alcohol at a 1:1 ratio (that is, one part paint to one
part rubbing alcohol). Mist on a very thin coat over the entire
model—it will dry in a minute or so. Then mist on another thin
coat. These coats will not cover the model evenly—the idea is
to gradually build up the layers. Keep misting on the coats.
Then put on a slightly heavier wet coat or two and let the model
dry overnight. It should be glossy black. When the model is
dry, inspect it closely. The glossy finish will reveal flaws
and such and you can repair these (using the sanding pads) and
then respray. Typically, I try to keep my patience, sand out
flaws in the color coat,
and then respray. Basically, it depends
how much work you want to put into it. I eventually reach a
point where I say good enough. You are now ready for the metal
coat.
Alclad recently put out a gloss black
undercoating, which I assume is laquer based. So it would have
the advantage of drying very quickly (like a few minutes) so you
don’t need to wait overnight between coats. This way you could
do more touchups in a shorter period. I guess in theory you
could prime, sand, spray with the black undercoat, and then
paint the metal coat all in one night.
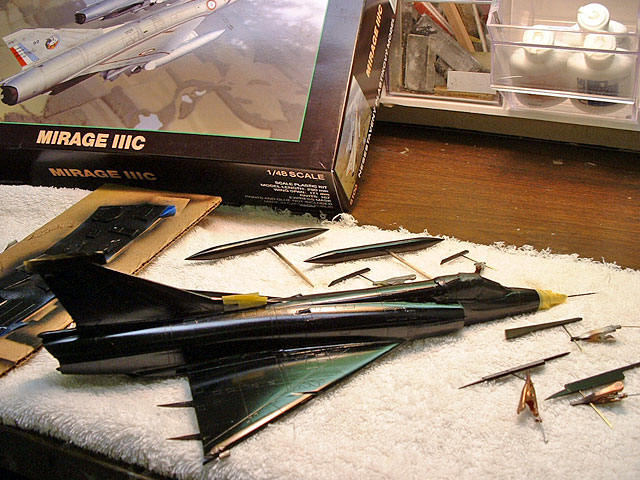
Figure 4: A Mirage III
model after the gloss black base coat.
Alclad II comes in a wide variety of
shades. I recommend using one of two colors for your overall
base coat: Chrome or Polished Aluminum. These really look like
you have dipped your model in a thin coat of metal. The other
finishes (aluminum, white aluminum, dark aluminum, steel, etc)
are fine, but I don’t think they look quite as cool as the
Chrome or Polished Aluminum for the base coat. These two paints
create a finish similar to that from a brand new aircraft or a
recently restored one. For example, at the USAF Museum at
Wright Patterson AFB, they restored the B-58 Hustler about a
decade ago and polished the entire surface of the aircraft using
a powdered cleanser to clean away all the years of grit and
grime. The shiny aircraft looks absolutely spectacular now
(particularly since they are keeping it inside out of the
weather).
To apply the Alclad II, apply several thin
coats with your airbrush using about 12-15 pounds of pressure.
You will witness an amazing transformation. Some fine pigment
or mica is in the translucent Alclad II paint and it interacts
somehow with the black to make the finish look like metal. It
is really truly amazing. The Alclad II is ready for masking
about 15 minutes after you airbrush it—the advantages of a
laquer paint.
To be continued in Part Two
 Home |
What's New |
Features |
Gallery |
Reviews |
Reference |
Forum |
Search
Home |
What's New |
Features |
Gallery |
Reviews |
Reference |
Forum |
Search