|
How
To Make a MiG Fly
by
Floris Lok
|
There are many ways to present your scale model. One of them is to let it
fly. Virtually of course, but it is a very nice way to depict your plane
realistically.
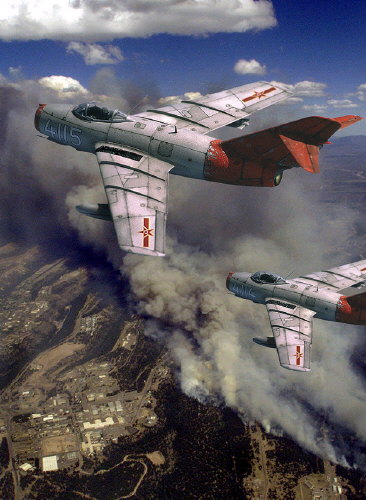
In this article I will show step for step how to make a simple
photocomposition, in this case a pair of MiG-15's in flight.
You will need a camera. A single lens reflex camera with a 50, 80 or 100mm
lens is fine. You will also need a computer (which most of us surfers already
will have). It doesn't matter if it is an Apple or an ordinary PC. Next is a
scanner to get the pictures on your screen.
Most of us who send in pictures to Hyperscale will have all these things. And
oh, before I forget, first you have to make a model!
Step One
 The
first step is certainly one of the most important - choosing the right
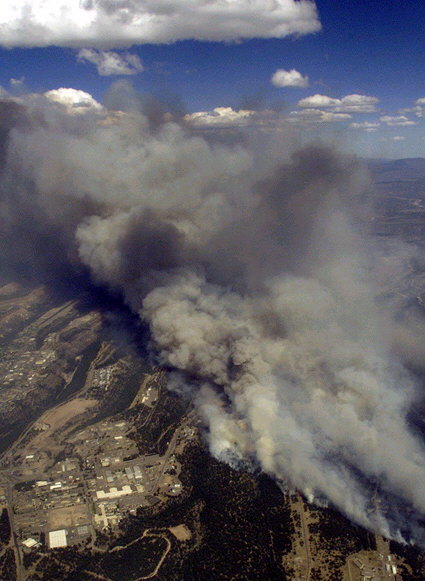
background photograph. These are the thing to consider: The
first step is certainly one of the most important - choosing the right
background photograph. These are the thing to consider:
a. It must have high technical quality - sharp
and good colours.
b. It must have a certain historical
correctness. The ideal is to get a picture from the actual period where
the plane is from. This is often impossible, so you can use a picture
which could be the place and time you want to show. It will be easiest to
start with a simple shot of a blue sky with some clouds. You even use some
of your own holiday snaps!
c. The light conditions. Very important for the
final result. A very warm coloured sundown is very moody, but realise that
the plane under these condition will be not more than a silhouette! For
this project I used a news picture from some weeks ago, from a fire
somewhere. It wasn't Korea during the early 50's, not at all, but it could
have been. |
Step Two
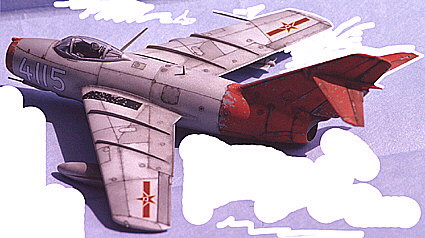
 Now
that you have the background, you also need a foreground. Here we take use
the camera. Mostly I use colour slides, but good colour prints will do
also. Now
that you have the background, you also need a foreground. Here we take use
the camera. Mostly I use colour slides, but good colour prints will do
also.
More important are the light conditions under which you take the actual
picture. Here you must closely study the background pic. The two pictures
must have common atmosphere. Sunlight from the right? Than take the plane
with the sunlight from the right to! Fill-in flash is fine for getting
some detail in the shadow parts, but never use flash alone. The result
will be sharp but very cold and will not have the 'warmth'of real
daylight. |
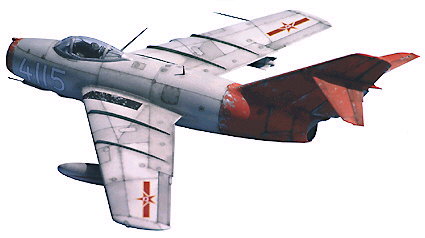
Step Three
| Now that you have two images, they must be
brought together.
First the plane must be 'standing free'. To achieve this, you 'paint'
everything around it white by using all kind of different electronic
brushes. The software I use is Adobe Photoshop 5.5, but other and cheaper
software are ok to.
Once everything around the model is painted with, that part is easely
selected. Then 'invert' this part and the plane is selected. 'Copy' this
and 'Paste' it in the background.
The job is nearly done! |
|
Final Step
| Placing
the plane correct to get a balanced composition is very personal. Just try
a few variations and see what looks best!
The little MiG in my composition is the same photo as the big one, only
scaled down. I changed the number by copying the first '4' and pasted it
over the last '5'.
I lightened the left flap a little and added the glow of the
afterburner to the other.
Finally I will say to everybody who's into modelling - let those
P-51's, Bf 109's and Spitfires fly!!!! |
Text and Images Copyright © 2000 by
Floris Lok
Page Created 21 June, 2000
Last updated 18 May, 2001
Back to HyperScale
Main Page
Back to HyperScale Reference
Library
|
 Home |
What's New |
Features |
Gallery |
Reviews |
Reference |
Forum |
Search
Home |
What's New |
Features |
Gallery |
Reviews |
Reference |
Forum |
Search