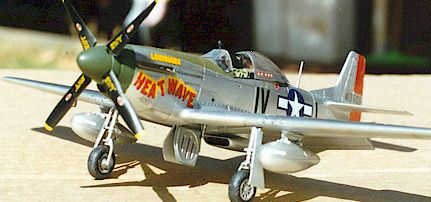
Among my favourite aircraft and modelling subjects are P-51 Mustangs, P-38 Lightnings,
P-47 Thunderbolts, F-86 Sabres, MiG-15s and E.E. Lightnings. A common finish to all these
aircraft is natural-metal. Many aircraft modellers feel natural-metal is the hardest
finish to get right - a viewpoint I wholeheartedly agree.
Since deciding in the early 90s that I really wanted to model my favourite aircraft
subjects I went about finding out how to paint "natural metal finish" (NMF).
I’ve now done about seven NMF models and I’m pleased to say they’ve turned
out OK - not world-beaters, as the aircraft competition is tough here in South Australia.
Other modellers have looked at these models, particularly my P-51Ds, and asked me how I
achieved the NMF.
| A
P R O C E S S F O R N A T U R A L M E T A
L F I N I S H E S |
Afer much experimentation, I can now present a summary of the process I now use
religiously for painting NMF.
- Be very careful in construction, i.e. if necessary, clean up all seams and gaps with a
smooth filler (I use super-glue as opposed to a "shrinking" filler/putty which
may have a "flat" or "grainy" surface). Be warned that any
"less-than-perfect" seams and gaps will stand out like a sore thumb under any
NMF.
- Before painting, sand out blemishes and scratches with 1200 and 1600 wet-and-dry
sandpaper.
- Tamiya Plastic Polishing Compound is then applied with an old soft rag to polish out any
remaining fine scratches. The "white powder" residual can be removed from
recessed panel lines by rinsing in soapy water and scrubbing with an old toothbrush (if
still some residue remains then remove using a wooden toothpick).
- I’ve settled on the Floquil metallics for my NMF. I mainly use "Old
Silver", however "Bright Silver" gives a very shiny finish.
"Old/Bright Silver" is best thinned to about a 65/35 ratio with Floquil
"Diosol" (Floquil’s thinner) and then airbrushed on in fine mist coats.
Under no circumstances use "Diosol" as a paint-stripper to "strip" off
an unsatisfactory NMF finish as the "Diosol" will aggressively "burn"
the plastic - I’m speaking from experience here.
- "Old/Bright Silver" is touch-dry in about 1 minute and can then be polished
with a soft cloth (I leave it for at least 30 minutes).
Dry "Old Silver" looks like any flat/matt silver paint. Don’t be fooled by
the dull appearance as a polish with a soft rag will give it a nice shine.
Do not be surprised if after the first coat you need to clean up your seams before
applying the final NMF coat/s.
- To achieve different panel tones, especially with "Old Silver", selected
panels can be masked off with Post-it Notes (that’s right the ones you write messages
on) and Tamiya masking tape. The remaining panels and areas are then vigorously polished
with SnJ "Polishing Powder" dabbed on with the supplied SnJ soft cloth.
- Anti-glare panels and trim colours can be easily applied over "Old/Bright
Silver" as it can be masked over - again I suggest using Tamiya masking tape.
- A gloss coat over "Old/Bright Silver" is not needed before decaling, as the
painted surface is very smooth from polishing.
- A clear coat to seal paint/decals/weathering is optional. I’m yet to seal a finish
and the finish of my NMF models is yet to deteroriate (some are now four years old).
Floquil’s "Silvers" can also be used an undercoat for camouflage schemes
as the camouflage paint can be chipped/scrapped off to reveal the "Silver" below
- great idea for Japanese WW2 schemes which weathered heavily.
As with most modelling products there is a health and safety consideration. A breathing
mask must be worn when using the Floquil "Silvers" and SnJ polishing powder (the
finely grained powder is harmful when ingested).
If you are into natural-metal finishes and haven’t got an SnJ Starter Kit then you
don’t know what you’re missing out on.
The process I’ve outlined is simple but effective. You may find cleaning up your
seams will take longer than with most camouflage schemes but the NMF result is worth the
extra time and care.
So now you have no more excuses for doing some of those nice looking "silver"
P-51s, P-47s etc. Go to it!
If you have any queries please email me on kerrjands@ezinet.com.au. If you do try the
"Bawhey/Kerr" process (named because Graeme Bawhey and I experimented with
several metallic paints and SnJ before deciding the Floquil/SnJ combination gave the best
results) please let me know how you went.
Happy modelling!
John Kerr
South Australian Plastic Modellers' Association (SAPMA)
Adelaide, South Australia
Model, Photograph and Text Copyright 1998 by John Kerr.
Page Created on 10 June, 1998.
Last updated 18 May, 2001.
Back to HyperScale Main Page
Back to Reference Library
 Home |
What's New |
Features |
Gallery |
Reviews |
Reference |
Forum |
Search
Home |
What's New |
Features |
Gallery |
Reviews |
Reference |
Forum |
Search