![]()
Messerschmitt
Me 262 in Detail
Part One
Me 262B-1a/U1 Night Fighter
by Charles Hugo
|
Messerschmitt
Me 262B-1a/U1 |
Background and Modelling Summary by Brett Green
A Detailed Photo Walkaround Including 60
Thumbnailed and Captioned Images of
Messerschmitt Me 262B-1a/U1 "Red 8"
CONTENTS
Introduction
"Red 8" W Nr 110305 - Post War Service
by Brett Green
Colours and
Markings
by Brett Green
Modelling the Me 262B-1a/U1
by Brett Green
The Messerschmitt Me 262B-1a/U1 in Detail - Photo Walkaround
Images and Captions by Charles Hugo
1. Cockpit and Canopy (13 Images)
2. Forward Fuselage and Cannon Bay
(10 Images)
3. Mid-Fuselage Including Main
Undercarriage Bay (14 Images)
4. Rear Fuselage and Tail Surfaces
(10 Images)
5. Wings and Jumo 004B Powerplants
(12 Images)
| "Red 8" - P o s t W a r S e r v i c e |
by Brett Green
Werknummer 110305 is a Messerschmitt Me 262B-1a/U1 night fighter equipped with FuG218 radar.
This aircraft served as "Red 8" with 10/NJG11.
"Red 8" was surrendered at Schleswig and ferried to Gilze-Rijen on 18 May, 1945 before flying to RAF Farnborough in the United Kingdom on the following day.
The aircraft was slightly damaged on a subsequent ferry flight but returned to serve with the Fighter Interception Development Squadron until September 1945. During its active service it was allocated the RAF serial number VH519.
"Red 8" was shipped to South Africa on 23 February 1947, arriving at Cape Town on 17 March.
This important aircraft was restored for display in 1971 and has been an exhibit at the South African National Museum of Military History in Johannesburg since 1972.
| C o l o u r s |
"Red 8" wore an interesting colour scheme. Its upper fuselage was painted in a patchy mottle of RLM 76 White-Blue, RLM 81 Brown-Violet and probably RLM 82 Bright Green.
It is not entirely clear from contemporary photographs if the finish represents a brown and green mottle over a light base coat, or if the lighter colour has been sprayed over a solid 81/82 fuselage. It is also possible that the light colour is, in fact, the grey-green colour used as a substitute for RLM 76 late in the war. For more details about the use of these colours, see the "Late-War Luftwaffe Fighter Camouflage" series here on HyperScale.
The bottom of the fuselage, wings and most of the engine nacelles were painted in either RLM 22 Black, or a Black distemper paint.
The upper wings were apparently finished in a solid coat of RLM 82 Bright Green.
It is difficult to determine the original colours of the nacelle uppersurfaces. Soon after capture the upper nacelles appeared to have a light colour painted from the lip of the intake to the leading edge of the wing in a narrow band. However, later in British service the forward nacelles are black, with Dark Green on the top of the nacelle from behind the first panel line. The aircraft has been restored in this scheme.
At the time of its capture until the end of its British service this aircraft carried one auxilliary fuel tank painted black, and another in bare metal or painted in a much lighter colour (RLM 76 or RLM 02?).
Markings are interesting as well. The tail Hakenkreuz is an exaggerated stencil design in solid black. The fuselage Balkenkreuz is also solid black. Wing insignia are white on upper and lower surfaces. The aircraft number, 8, is red with a white outline. In line with other Me 262s from NJG 11, the number is located on the mid-forward fuselage but it is much smaller than those observed on its sister aircraft. The red "8" on the port side is applied crookedly. The last three numbers of the werknummer, 305, are applied in small white digits on each side of the extreme nose.
The small nose cap appears to be painted a solid dark colour - perhaps red or RLM 81 ? It is also possible that this is a post-war modification.
| M o d e l l i n g t h e M e 2 6 2 B - 1 a / U 1 |
Modellers are surprisingly well catered for with the Me 262B-1a/U1. Here is a snapshot of some (but not all) of the choices in three scales:
Revell 1/72 Scale
 This is a beautiful little kit. It should also be available at a
bargain-basement price. I picked up one of these little gems for less than Aus$6
(US$3.90). In relative terms that's reminiscent of the "pocket money" models I
used to buy as a kid!
This is a beautiful little kit. It should also be available at a
bargain-basement price. I picked up one of these little gems for less than Aus$6
(US$3.90). In relative terms that's reminiscent of the "pocket money" models I
used to buy as a kid!
This is not an old mould with chunky detail and raised panel lines. The recessed panel lines are very nice indeed. Detail is subtle within the limitations of the injection moulding medium. In this scale some of the smaller details should be replaced, including the radar antennae and the DF loop.
Revell have maximised the use of their moulds by sharing most parts with their single-seater Messerschmitt Me 262A-1a kit. The fuselage is converted to either the two-seat or single-seat version by a choice of upper fuselage fillets.
Only a few areas require attention. The intakes for the Jumo 004 engines are oversimplified; and the lower wing section includes a completely enclosed (and totally fictitious) "wheel well". It is hard to understand this error, as Revell have carefully detailed the bottom of the cockpit tub - essential if the undercarriage area is open but totally invisible behind the blanked-off wheel well.
The most authentic solution is to simply cut out the entire enclosed wheel well and add a little detail to the interior of the fuselage sidewalls. The only problem with this method is that the undercarriage legs locate in the outboard section of the enclosed wheel well. Therefore, the most practical remedy is to remove the wheel well inboard of the main gear leg mounts.
The canopy is moulded shut but a fine razor saw will easily address this.
This model is certainly the best value Me 262B-1a/U1 in any scale.
Dragon/DML 1/48 Scale
 It is hard to believe that this kit was released in 1993. It seems like
yesterday.
It is hard to believe that this kit was released in 1993. It seems like
yesterday.
This is a fabulously detailed and accurate rendition of the Me 262B-1a/U1. The cockpit looks great straight from the box - even etched harnesses are included.
The wheel well is extraordinary. It contains folded-steel detail parts that, when applied correctly, really look special. The inside of the fuselage has structural detail moulded-on with extra detailing parts supplied, with the bottom of the cockpit and the firewalls similarly busy.
Photo-etched parts are also included to finish the radar aerials and DF loop.
This kit supplies details that were virtually unheard of in 1993. Some of these "superdetailing" parts include canopy handles and locking levers, aileron and gear door actuators plus various switches and quadrants. Only a few small items (for example, the prominent elevator mass-balances shown in Charlie's photos) need to be added.
The bad news? It is not an easy build. A great deal of time, planning, dry fitting, patience and, ultimately, putty will be required to get this bird living up to its full potential. Dragon have also supplied horrible rubber tyres. These look okay in the box, but they are virtually guaranteed to perish and crack over time, or eat the plastic wheels. Honestly - it happened to mine! Resin replacements are the only answer
It is possible that Revell will release this kit with plastic parts replacing the fiddly etched steel. This will simplify the construction. Until then, be assured that your efforts will be repaid with a really impressive result.
Hasegawa "Collectors Series" 1/32 Scale
Charlie Hugo has built Hasegawa's 1/32 scale offering and describes it in his Construction Feature.
| M e s s e r s c h m i t t M e 2 6 2 B - 1 a / U 1 i n D e t a i l |
Click on
the Thumbnails to enlarge images.
All captions by Charles Hugo.
1. Cockpit and Canopy (13 Images)
|
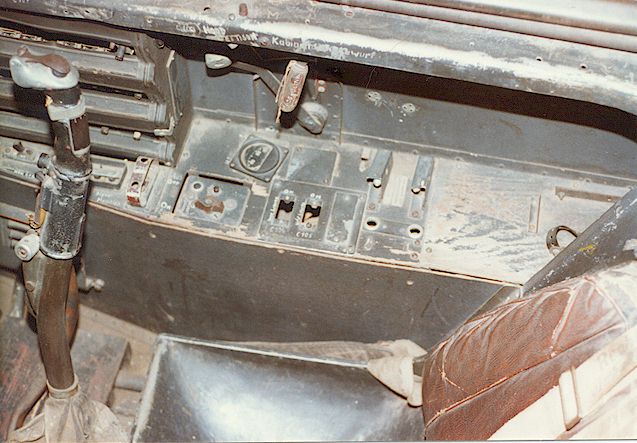
This is a photograph of the forward cockpit side console. As far as I know it is still in the original colours. |
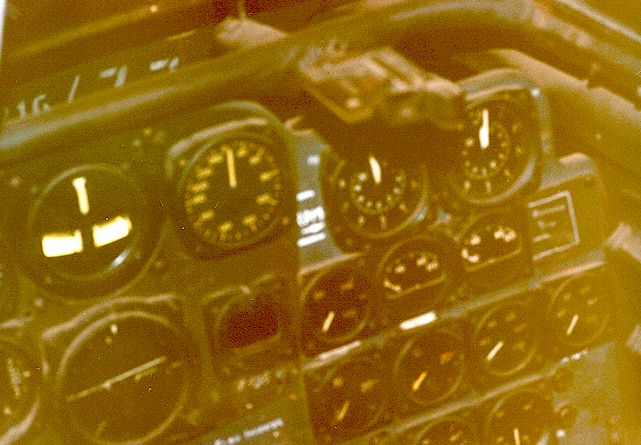 |
Main instrument panel. Unlike the rear cockpit where the radar set has been removed, the front office is mostly complete |
 |
Poor quality shot direct down into main cockpit. Note the unusual wooden board at the bottom. |
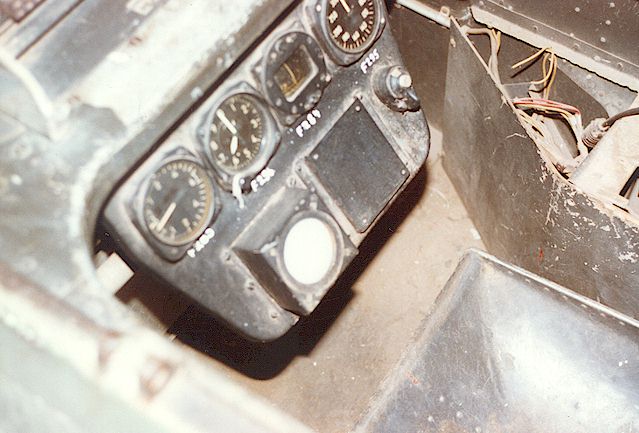 |
Rear instrument panel close-up |
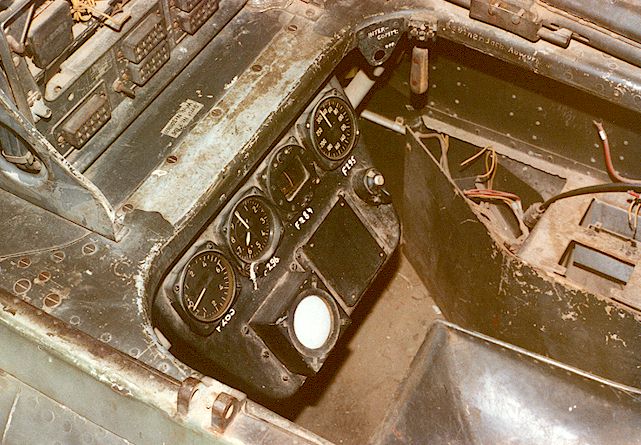 |
Another general view of rear instrument panel. Note that the main radar unit was removed before dispatch to South Africa thus not fitted to this aircraft. All the mounts and other details are present though |
 |
View of rear seat with harness and rear fuel tank filler cap. Old photo with very worn paint finish |
 |
Internal view of pilots windscreen showing empty Revi mount and internally-mounted armoured glass |
 |
View of windscreen from the front. |
 |
View of forward fuel filler cap. Also note the lip at the bottom of the windscreen |
 |
Port side fuselage below windscreen. Is this a fresh air intake vent? |
 |
View of forward canopy showing grab handle and various other features |
 |
View of rear portion of the main canopy showing grab handle and locking lever |
 |
View from the rear of the DF loop. I am not certain if this is original but photos from 1972 show the same item fitted at that time. |
2. Forward Fuselage and Cannon Bay (Ten Images)
 |
View of
radar aerial mounting I am not too sure about the origins of this configuration. I believe the bracing was added by the British after a taxing accident damaged the radar array. |
 |
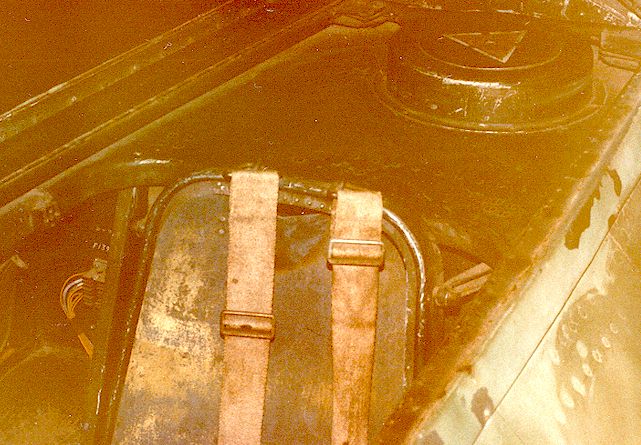
View of droptank on carrier. Note shell ejector slots. |
 |
Close-up of drop tank, mount and sway braces. |
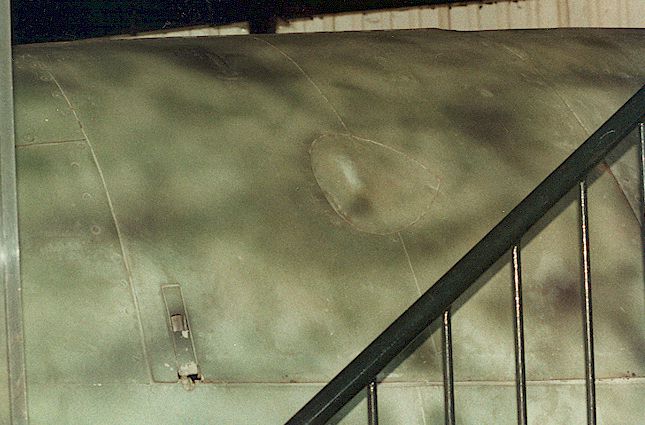 |
Cannon bay access panel showing the bulge to clear the chutes. Some colour shift (greenish) here due to artificial lighting |
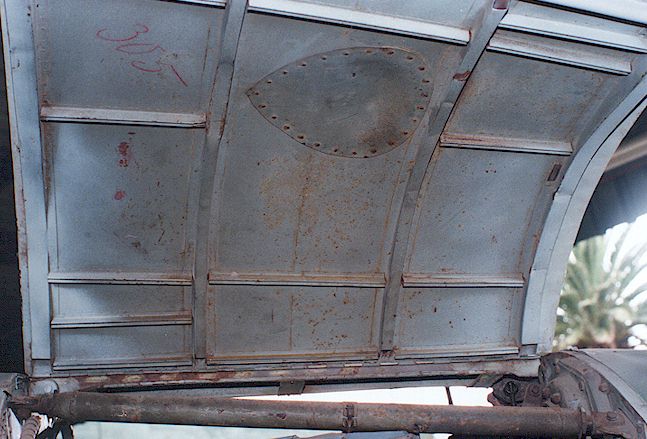 |
Cannon access panel from the inside. Note ring of rivets around bulge in panel. |
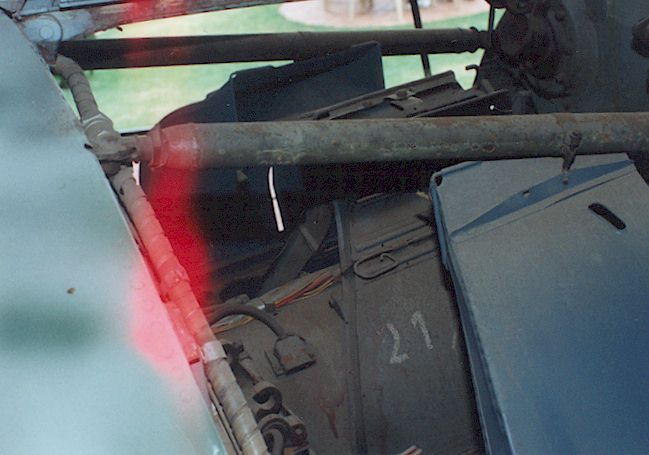 |
Overhead view of cannon bay from the right hand side. I don't know where the red flare came from in this photo. |
 |
That mystery red streak again! Cannon bay from higher vantage point than the other views. |
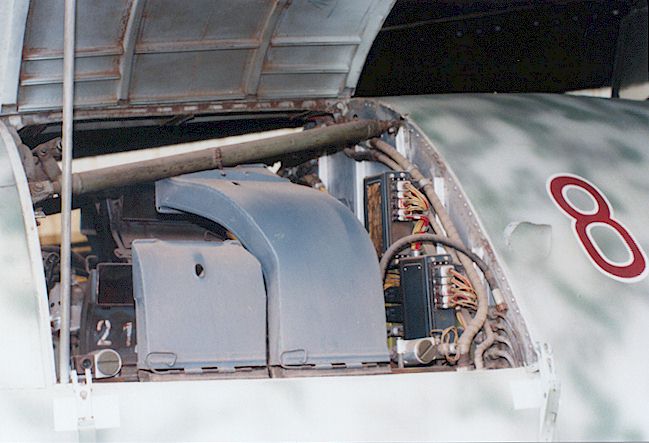 |
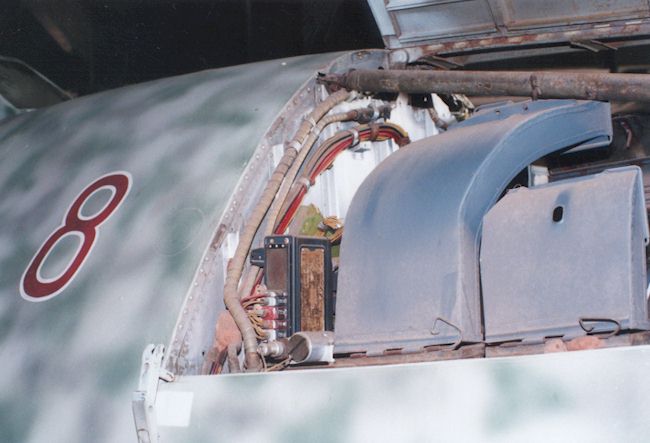
A view of the cannon bay from the left. The cannon unfortunately are no longer in the aircraft, but all the feeds and connections are in place. |
 |
View of cannon bay rear bulkhead. The colour is mostly natural metal although some structural items (support for nose) and shell ejector chutes appear to be RLM66 |
 |
3. Mid-Fuselage Including Main
Undercarriage Bay
(14 Images)
 |
View of the forward pair of flare chutes. |
| View of the rear set of flare chutes. | |
 |
View of access panel and kick-in step closed on fuselage. |
 |
Kick-in step access cover shown open. |
 |
Side view of the DF loop |
 |
View of main undercarriage leg. Note the nacelle in this view is in dark green which is incorrect |
 |
Inside the main wheel well looking at the undercarriage leg and pivot point. |
 |
Left main wheel well looking up and forward (I think). What appears to be the kick in step is on the top left corner |
 |
Outward-facing view of the main wheel well. A rats nest! |
 |
Inward-facing view of main well to inner door mounts. I think the front of aircraft to the right |
 |
Another view up into the wheel well. The main wheel well is simply a void inside the fuselage. All the plumbing and electricals are visible, as is the bottom of the cylindrical cockpit tub. |
 |
Looking up into the starboard side of the wheel well. This is the inside of the fuselage starboard sidewall with the cockpit tub just visible at the top right hand corner of the photograph. |
 |
Looking further up into the starboard side of the wheel well. The cockpit tub is at the top of this picture. |
 |
Another shot of what I think is the port side of the mainwheel well. |
4. Rear Fuselage and Tail Surfaces (10 Images)
 |
Aileron trim tab link. Note the interesting double link |
| Another view of the aileron trim tab linkage | |
 |
View of elevator trim tab. Note the linkage is missing . |
 |
View of rear formation/identification light. Cover is missing |
| Starboard elevator showing the mass balance. Note the lightening hole. | |
 |
View of the port elevator showing mass balance from a different perspective to previous |
| FuG 218 Neptune V/R tail warning radar mount. This radar was more than likely never fitted to the aircraft. | |
 |
View of vertical and horizontal fin surfaces joint. Note the plate at the front. It is interesting to note how crudely the Me262 was finished in comparison to modern aircraft |
 |
View of tailplanes showing stencil detail |
 |
View of tail fin and aerial location. Note the stenciled swastika of this aircraft. |
5. Wings and Jumo 004B Powerplants (12 Images)
| Two views of the pitot tube. As can be seen the museum was very serious about the nicht antassen and placed a perspex screen around the public walkway | |
 |
Black does not photograph well, especially in shadow. This view shows the forward part of the nacelle uppersurfcaes have been oversprayed with black. This photo was taken around 1983 and subsequently the colours have been changed slightly in line with further research. The general view is that, when delivered, the wings and nacelles of 110305 Red "8" were finished in RLM 82 . The forward portion of the nacelle was subsequently oversprayed by the British with black or RAF dark green whilst in their care. This is supported by photographs that show Red "8" with fuel stencils when captured but later, before shipment to South Africa, the stenciling had disappeared. |
 |
Rear view of engine nacelle showing the double row of cooling inlet slots. The red tint on the inside is more than likely the rust inhibitor |
 |
View of left nacelle. At this stage the finish suggests that this section of the nacelle was painted dark green which, according to photographic references and interpretation is not accurate. |
 |
View of right nacelle taken at the same time as previous shot. |
 |
View of access panels over the engine nacelle on upperwing. |
 |
Close-up of intake for Jumo 004 engine. Note the colours in this shot are considered by some to be wrong. The entire fixed portion of the nacelle which is part of the engine should be black, not Dark Green 83 as shown |
 |
This view of the engine shows the black oversprayed inlet cowl. Engine appears to have had red-coloured preservative/rust inhibitor applied |
 |
Another view of the engine from the left, this time looking back. The hellgrun RLM82 overspraying the black is clearer in this photograph. It is interesting to note that the aircraft has had 3 "correct" paintings. Ron Belling, a renowned aviation artist and historian in South Africa described the colour scheme when she arrived as Wings a bright green (RLM 82 hellgrun). The upper section of the forward nacelles appeared to have a thin coat of black overspray (as per picture), but later this was later depicted as RLM 83 Dark Green. At one time the aircraft also had the wings and nacelles painted RLM 82 without the darker forward section. More discussion on this later. |
 |
Forward view of engine from the right. |
 |
Another angle showing engine detail. |
| R e f e r e n c e s |
Information and/or photographs of "Red 8" may be found in the following publications:
"War Prizes" by Phil Butler.
Published by Midland Counties Publications, 1994, England
ISBN 0 904597 86 5
Model Art Special No. 367
"Messerschmitt Me 262". Published by Model Art Company, 1991, Tokyo
No ISBN or ISSN quoted.
Go to
Charles Hugo's Messerschmitt Me 262B-1a/U1 Construction Feature
Back to HyperScale Main Page
Back to Reference Library