|
Masking
Canopies
by David
W. Aungst

HyperScale is proudly supported by Squadron
I have read many reviews where the author discusses brief details about
masking the cockpit areas in preparation to painting the camouflage colors on a
model. In most cases, the description revolves around stuffing something (like
wet or dry tissue paper) into the cockpit to protect it. Some authors also
mention using tape, applied around the cockpit edges to protect the cockpit.
While both these methods do their job (keeping paint out of the cockpit),
neither one addresses painting the canopy glass. In the case of a camouflaged
aircraft, the demarcation lines between colors can fall right across the canopy.
Getting the lines to match up when the canopy is painted at a later time can be
difficult. Also, the "feel" of the paint on the canopies can be
different if they are not painted at the same time as the rest of the model.
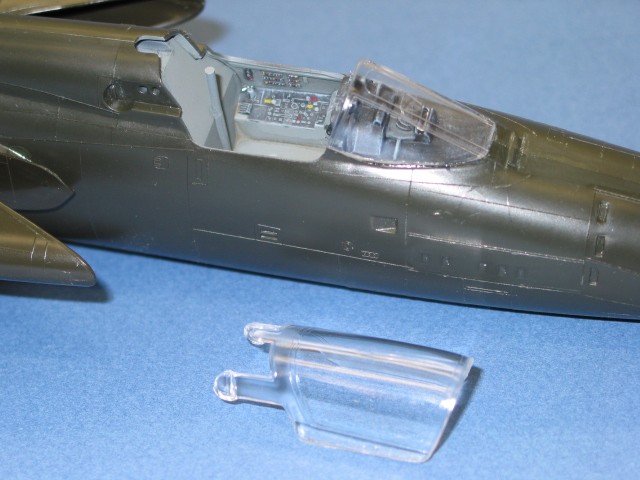
I my opinion, nothing covers the cockpit areas better than the kit's canopy.
After all, it was molded to do exactly what the real canopy does -- seal the
cockpit from the outside. The following steps outline the typical approach I use
for cockpit and canopy work.
Masking
the Canopy - Step by Step |
- First, I complete the cockpit painting and assemble the fuselage. I then
complete whatever upper cockpit areas need attention (like the top of the
instrument hood).
- Following the completion of the upper cockpit areas, I permenantly attach
the non-moving portions of the cockpit glass (like the windscreen). On a
two-seat aircraft, this may also include a center section (like on an F-4
Phantom).
I do these attachments with a small bead of white glue applied around the
edges of the glass. Then I press the glass into place. After the white glue
dries, I use a wet Q-tip to remove any excess glue that squished out during
the process to attach the glass.
After another short drying period, I then apply a thin bead of super glue
around the glass. The white glue acts as a gasket to keep the super glue
fumes from getting inside the glass and making any fogging that I can't
reach. I keep the super glue bead very fine as I only want to stengthen the
already present white glue joint. Generally, no sanding is needed to finish
the super glue joint as it mostly dries to nothing. Any fogging on the
outside of the glass can usually be scraped off with a plastic blade
without marring the glass.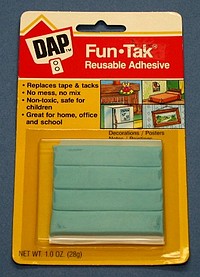
- Next, I "temporarily attach" the moving portions of the glass
(the actual canopy).
The key to this process is a substance called Fun-Tak. This is a blue
putty-like substance sold by DAP for hanging posters on the wall and
other such purposes. I bought my Fun-Tak at a Five-and-Dime store in the
stationary department. It cost $1.29 for a pack, but that was many years
ago.
Many various things can do the required work for cockpit masking purposes,
but I have found that Fun-Tak is the best. It leaves no oily residue, it is
very plyable, and it never dries out. The wad I have been using has been
open and just stuck on the side of my paint booth for the last fifteen or so
years.
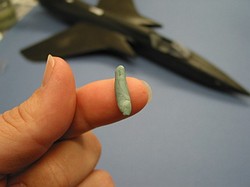
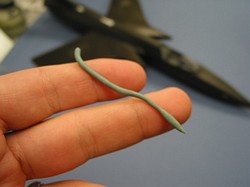
- I take a small amount of Fun-Tak and roll it between my figures to make a
long spaghetti piece.
-
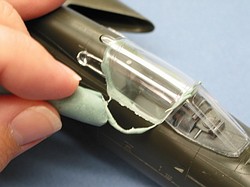
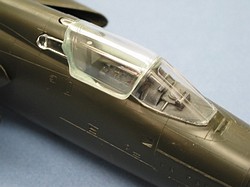
I put the spaghetti piece around the cockpit edges as shown.
Then, I squash the canopy down into the Fun-Tak. If the canopy has separate
framing pieces, I assemble the canopy so that it is complete. In my example
pictures (of a Monogram THUD), the canopy is one-piece with no extra
framing pieces.
|
 |
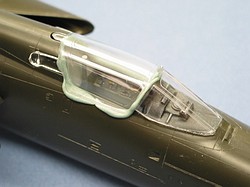 |
-
I take a second piece of Fun-Tak and use it to remove the
excess Fun-Tak that squished out when pushing the canopy into place. Gently
rub the Fun-Tak back and forth along the canopy edge until all the excess Fun-Tak
is removed.
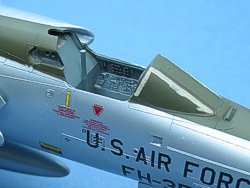
-
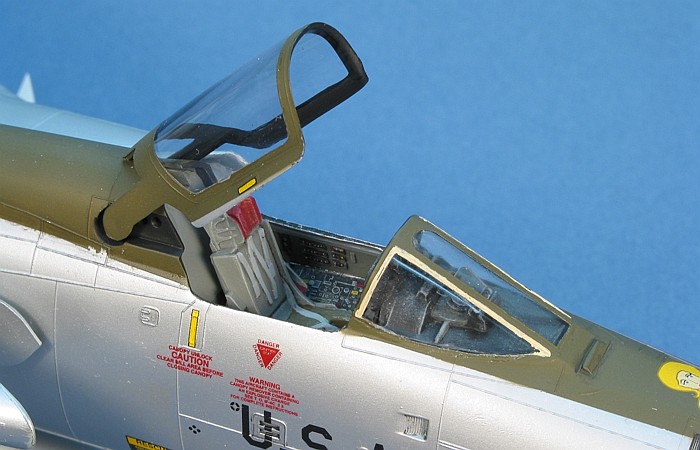
With the canopy full seated over the cockpit, I mask the clear
portions using Parafilm-M. I'm in love with this stuff. It is the only thing I
use any more for masking canopies. It is important that I have not applied the
Parafilm before removing the excess Fun-Tak. Fun-Tak sticks extremely well to
Parafilm. If I had masked the clear parts first, the process of removing the
excess Fun-Tak would also remove the Parafilm.
-
I will leave the canopy on the model in this state through
painting, gloss coating, decaling, flat coating, and weathering. Only after
the model is fully weathered will I remove the "loose mounted"
canopy pieces and finish the painting of the cockpit sills and inside canopy.
This way, the paint on the outer canopy is guarenteed to be a match to the
rest of the model because it was present for all the painting and weathering.
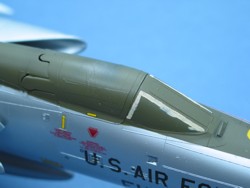
Here you see the canopy after painting, decaling, and weathering. It is ready
to come off so the cockpit sills can be completed.
There you have it. To remove the Parafilm from the canopy,
I use a strip of Evergreen styrene (.080 by .100 inches). I file
the end of the strip into a chisel point and scrape off the Parafilm. With
the Evergreen styrene being rather soft, It does not damage the
canopy and usually not the painted finish either.
Text & Images Copyright ©
2001 by David W. Aungst
Page Created 23 November, 2001
Last Updated
19 April, 2004
Back to Reference Library
|
 Home |
What's New |
Features |
Gallery |
Reviews |
Reference |
Forum |
Search
Home |
What's New |
Features |
Gallery |
Reviews |
Reference |
Forum |
Search