|
How to build various F-16 Blocks
using Tamiya's kits
by Scott Brown

This is pretty specific to the Tamiya kits, but the general information applies to the Hasegawa kits as well, with the caveat that you can do any C model block from the block 50 Hasegawa kit….all the parts are there. It also covers only US versions.
A small primer in F-16C blocks
F-16Cs are block 25, 30 and 32. F-16CGs are block 40/42s. F-16CJs are block 50/52s. You will occasionally see F-16C+ in various places, which is fairly convoluted, and has to do with various upgrades to the series such as CUPID but the essential math on that is a C+ is a jet that is able to use targeting pods and GPS guided weapons.
Block designations: F-16s were built with Pratt & Whitney engines from day 1. The C models used the F-100-PW-220 in the first production block, the block 25. Up until that point, F-16A/B block #s had been 1, 5, 10, 15 and 20. The 25 was a continuation of that block designator system. The block 30 was slated to merely be the same progression, except….and this is purposefully vague….in there "they" decided that General Electric produced a great fighter engine, the F-110-GE-100, and since Pratt had the F-15C/E contract locked, it was unfair that GE was frozen out of the F-16 production. The original intent was to have the engines be interchangeable between airframes…..this is how it was sold, but as we know, the road to hell is paved with what?
So, since we now have a different engine available to the series, they changed the block designations to reflect which motor was installed in the block 30 series. A block with 0 is a GE, so the block 30s are GE powered. A 2 designates a Pratt powered jet, so the block 32s are Pratts. The blocks are the same otherwise……same jet, different engines.
Now, here's where it gets fun. "They" decided that the GEs performed better with more air, so the intake was enlarged to swallow more air, which as it turned out, didn't help the Pratts. The original F-16 intake is called NSI (Normal Shock Inlet) or "small mouth" and is installed on every Pratt jet. After #173 block 30, the new intake, called the MCID (Modular Common Inlet Duct) was installed. So, the first 173 F-16C block 30s have the small intake…….how do you tell? Well, the tail #s is a good start….all FY '85 block 30 jets are GE/NSI. In FY '86 there were a further 35 block 30 Cs with GE/NSI, ending with 86-0261. 86-0262 is a GE/MCID and all Cs after there, though be careful, there were Ds produced with tail #s from further back that were GE/MCID. The first block 30 jet with this combo was a D model, 86-0044. All F-16Ns were GE/NSI. All subsequent blocks followed the GE/MCID – Pratt/NSI rule.
Now, to convolute things further, "they" decided to make the F-16 TRULY multi-role and decided to add some capability in the ground attack mode with the introduction of the LANTIRN navigation/targeting system. This allowed the F-16 to do low-level, night and bad weather interdiction using terrain following radar and the use of laser guided weapons with the LANTIRN pod. This capability was introduced in the block 40 series…..which is the block 40 and 42….40s are GE/MCID, 42s are Pratt/NSI.
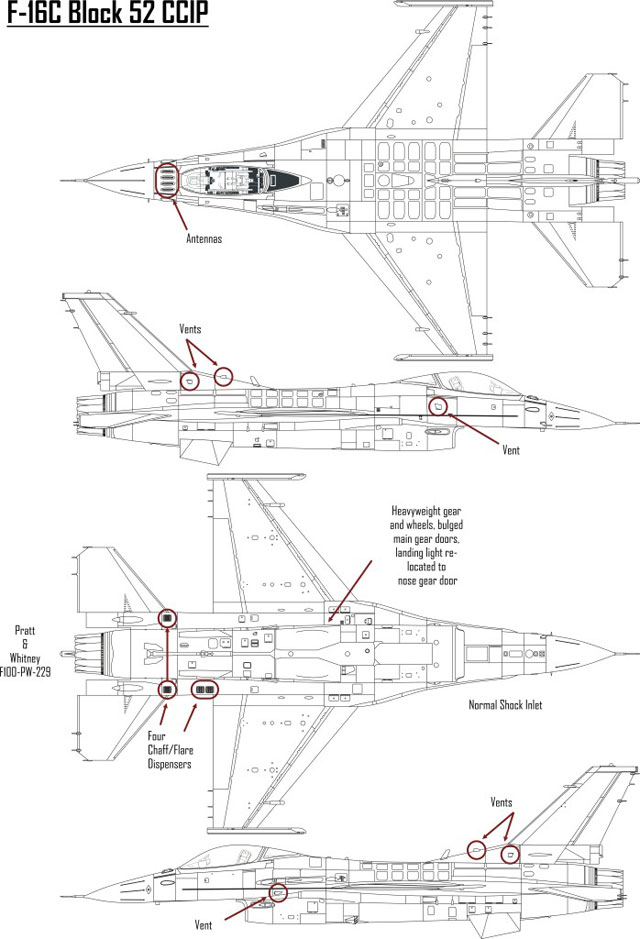
There are some physical changes between the block 30 series and the block 40 series. The aircraft needed to carry more weight between bombs and stuff hanging off of it, so the landing gear was made "beefier", the wheels are larger, which made it necessary to put a bulge in the main gear doors to accommodate the larger wheels, the LANTIRN pod interfered with the landing light position on the R main gear, so that was moved to the front of the nosegear door, and all that cool new LANTIRN and nav pod symbology needed someplace to be displayed, so the HUD was enlarged….called the WAR HUD (Wide Angle Raster).
Next up was the block 50 series, which are essentially externally the same, except until recently, they didn't carry targeting pods and returned to the normal sized HUD…..the heavyweight gear, big wheels and landing light position stayed the same.
We'll cover upgrades and other stuff in a minute.
F-16 blocks using Tamiya's kits
Tamiya produces 2 F-16s currently that allow you to come very close to making all C model blocks, the block 25/32 kit and the block 50 kit. The block 25/32s are Pratt/NSI and the block 50 is GE/MCID.
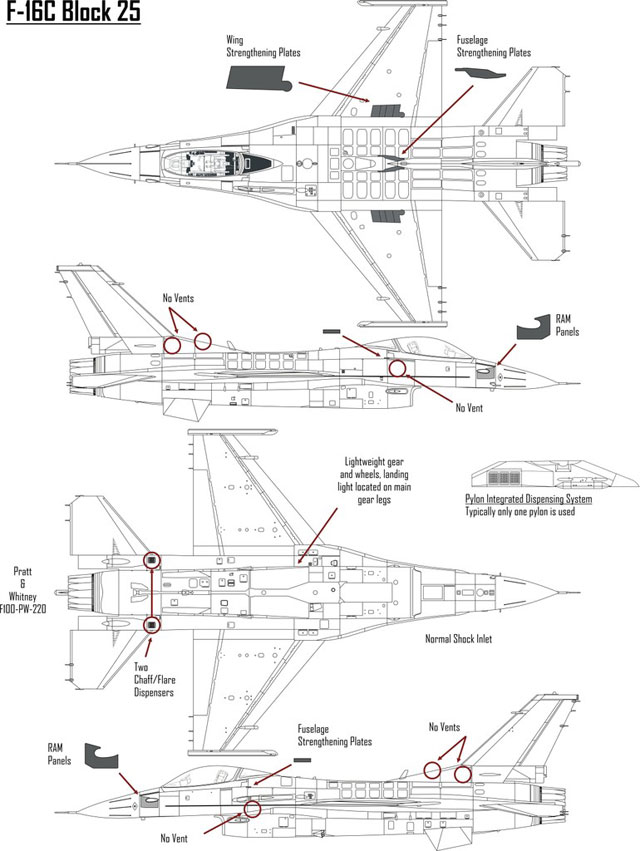
To get to a block 25/32, build it OTB. As the jets age, they have been fitted with external stiffening panels to combat fatigue and stress cracks and also some external RAM panels.. There is no clear delineation as to when a particular airframe received the mods…that's going to be for you to figure out. Tamiya makes an upgrade set for the 1/48 kit sold separately, which the 1/32 has them included. Also, Crossdelta makes a terrific set of external upgrades in 1/48 and Eduard does as well. This appliees to the Thunderbirds as well, except for the RAM panels. This is their last year with the 32s, and I'm assuming they will recieve full CUPID and be returned to combat status.
This is a diagram of the features of the blocks 25 and 32. Pay attention to the chaff/flare buckets, the lack of fuselage vents and the various strengthening plates. Also, the block 25/30/32 series is recieving the AN/APX-113 antennas (bird slicers) as a part of CUPID, so again, check your refs for the specific jet you want to do from a certain timeframe. Another area to watch is the wing leading edge RHAW antennas, or "Beer Cans"....these were not originally built into the block 25 or early block 30 jets, but were retrofitted later, so again, watch your refs. The diagram shows them in place.
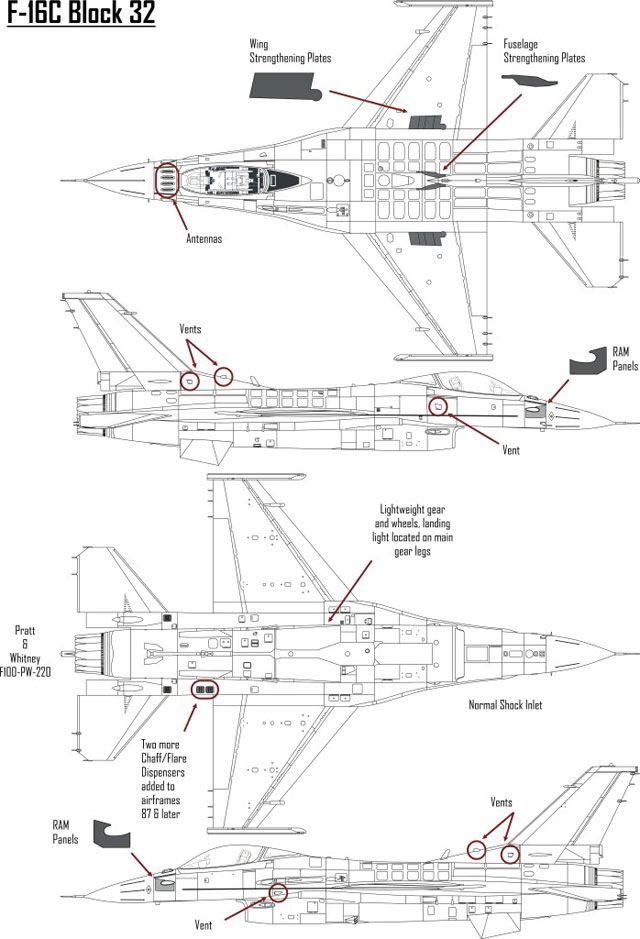
To get to a block 30, first you need to decide if the jet you want to do has an NSI or MCID intake. If it's GE/NSI, all you need to do is obtain a GE nozzle and aft fuselage section, sourced from either the block 50 kit or aftermarket. If it's GE/MCID, you'll need to swap the intake as well. This involves sprue H from the block 50 kit, which includes the intake upper and lower pieces, the intake R and L pieces and lip, the GE nozzle and aft section of the fuselage and the GE intake fan. In 1/32 it's a little more complex and requires sprues D, K/J x2, and H. Wheels are the same between block 25/30 and 32.
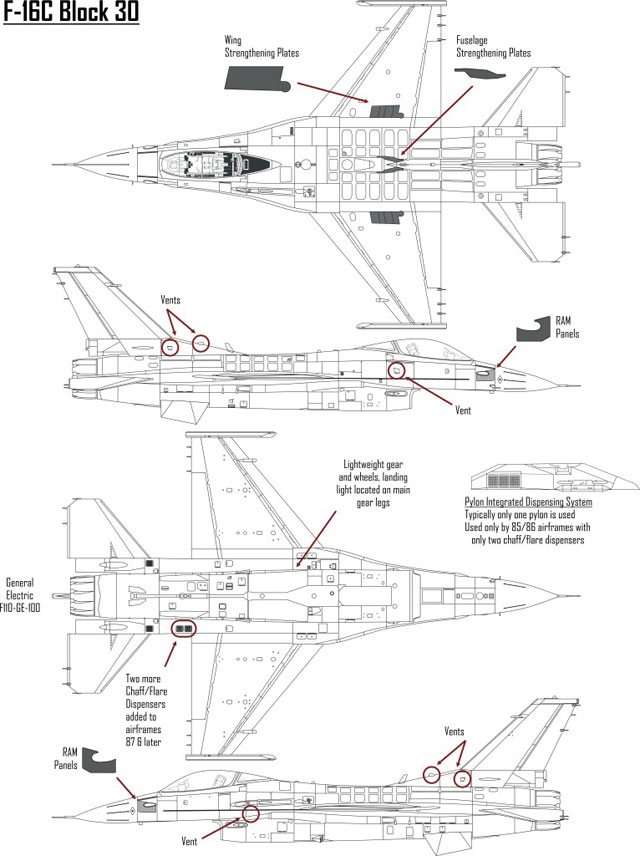
This is a diagram of the block 30. Pay attention to the vents on the fuselage, the chaff/flare buckets and the strengthening plates.
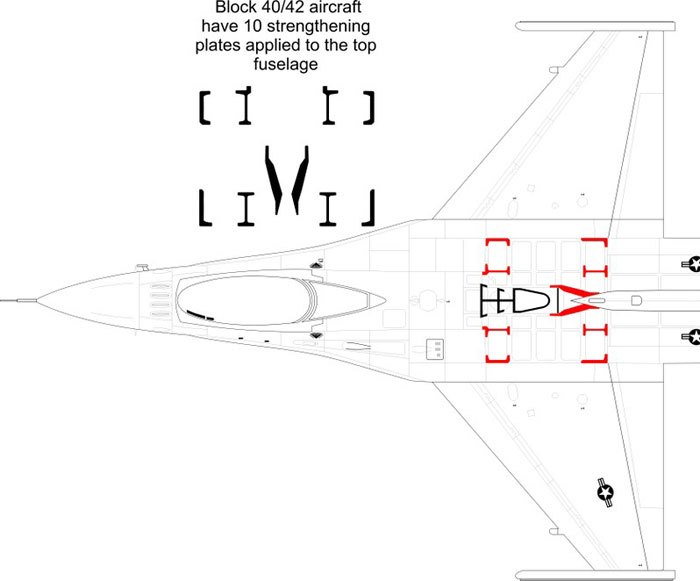
To get to a block 40, use the block 50 kit OTB. You'll need a WAR HUD, which comes in the Avionix cockpit, the Aires cockpit (albeit in photoetch) and is also included in the Eduard set for the block 50. Again, as the airframes aged, they required fuselage stiffening plates, which are diagramed here. If the jet you are portraying is from the early 90s, look closely to see if it has the fuselage stiffeners present. Again, Crossdelta is your friend in 1/48, Flying Leathernecks in 1/32. They also use the same wheels as the block 50 for a while now, though early in their service lives they used a different wheel, which can be obtained from the Hasegawa F-2 kit or in resin from Royale. Check your refs.1/32 you are kinda stuck.
A block 42 requires the exact same mods, except you'll need a Pratt engine and an NSI intake. Your source is from the Tamiya block 25/32 kit….sprue H again I believe, or in resin from Wolfpack Designs.
Block 50…..block 50 kit OTB. Block 52, again, you need a Pratt/NSI combo. Block 50/52 aircraft do not as of yet require any external stiffening plates. Be aware the block 52s and 42s are now equipped with the uprated F-100-229 motors that have the carbon fiber exhaust petals. Check refs again. This doesn't apply to the block 25s or 32s.
Obviously, the most expedient solution to the block question is to source 2 kits….the block 25/32 and the block 50 and swap intake/exhausts, leaving you with a block 30 and a block 42/52. Alternately, you can outsource the parts directly from Tamiya. Rainbow 10 and Hobby Link Japan are also good sources, as are your fellow model geeks. Pay attention to part F23 in the 1/48 kits and the corresponding part in the 1/32 kits….this is the area just in front of the landing gear bay. These parts need to stay with the kits they came in if you are swapping intakes/exhausts as they are specific to the block series in those kits.
CCIP
You hear a lot about CCIP, which stands for Common Configuration Implementation Program.
This is what allows the block 50/52s to drop all the cool ordnance nowadays and is an avionics and software program to upgrade the block 40/50 fleet. On block 50s, the external difference are the "bird slicers" in front of the canopy and the JHMCS sensor on the inside L side of the canopy. All block 50/52s are now CCIP, and a lot of the block 40/42s are, though the block 40 series doesn't have the IFF blades in front of the canopy, just the JHMCS sensor.
Anybody else, please feel free to jump in here. Feel free to print these out.
The best advice I can give is buy Jake Melampy's book, the Modern Viper Guide, which lists all this block stuff in superb detail, and spend some time at Greg Feiser's site Viper Information Page
To recap, if you want to build a block 30 from the Tamiya 1/48 kit, you start with the block 25/32 ANG kit. You will need the intake and exhaust from the block 50 kit. This is on sprue H. If you want to make a block 30 from the 1/32 Tamiya kit, use the Thunderbirds kit. You will need the intake/exhaust from the block 50 kit. These are on sprues D, the K/J combo sprue....you need 2 of these, and H.
Here's how to order from Hobby Link Japan:
http://www.hlj.com/faq/q41.html
Text & Images Copyright © 2008 by Scott Brown
Page Created 4 June, 2008
Last Updated 4 June, 2008
Back to Reference Library
|
 Home |
What's New |
Features |
Gallery |
Reviews |
Reference |
Forum |
Search
Home |
What's New |
Features |
Gallery |
Reviews |
Reference |
Forum |
Search