|
Trumpeter's Super Scale
Messerschmitt Bf 109G-6
Detail Analysis and Tweaks
by Lynn Ritger
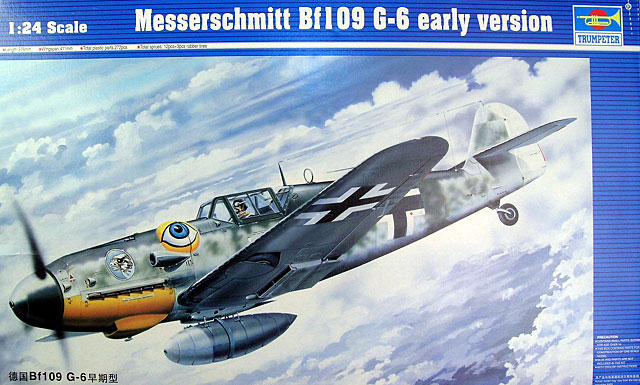
Lynn Ritger's sample Trumpeter
1/24 scale Messerschmitt Bf 109G-6
was supplied by Hobbylink Japan
So we've seen that Trumpeter managed to get the dimensions
reasonably close on their 1/24 scale Gustav family, which is heartening. But
what of the details in the kit?
Well, that's where I come in.
For those who are content with the "It looks like a _____"
approach, you may stop reading here. It most certainly resembles a Messerschmitt
Bf 109G-6.
However, those of you who demand more from your investment (and
make no mistake, any kit costing north of $100.00 USD should be considered an
investment) may be interested to read the remainder of this.
Seems pretty obvious to start here, doesn't it? And right off
the bat, we're confronted with one of the same problems seen on every other
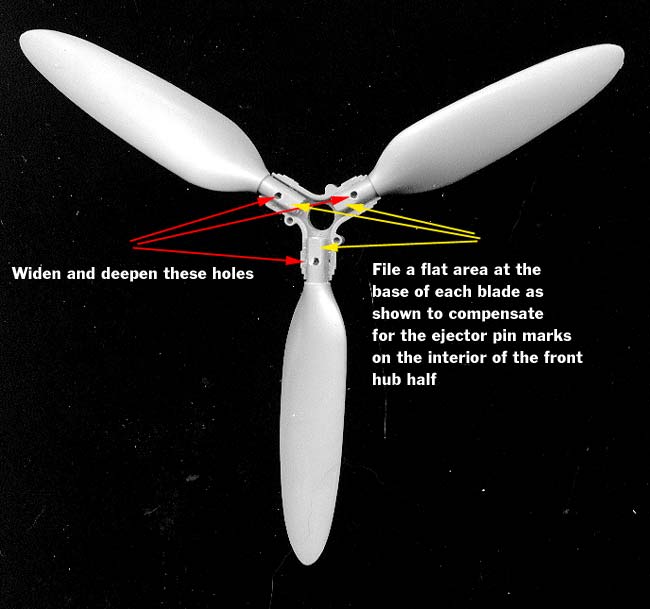
Gustav kit in any scale, namely an inaccurate spinner.
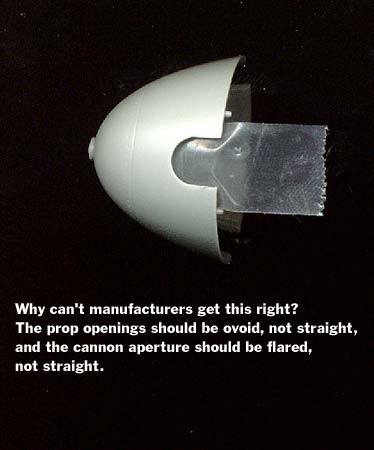 As you'll see in the scan, the prop holes on the kit have
straight edges. So what? Well, the original article has a pronounced ovoid shape
to these holes. The original article also has a slight flare to the tip of the
spinner aperture; this is absent from the kit as well. The rivets are tastefully
restrained, however, a feature thankfully shared on the rest of the kit
surfaces, and the overall shape is decent (see scan). As you'll see in the scan, the prop holes on the kit have
straight edges. So what? Well, the original article has a pronounced ovoid shape
to these holes. The original article also has a slight flare to the tip of the
spinner aperture; this is absent from the kit as well. The rivets are tastefully
restrained, however, a feature thankfully shared on the rest of the kit
surfaces, and the overall shape is decent (see scan).
The prop blades are
surprisingly good in shape... I have not measured them against drawings, but
they capture the shape of the VDM 9-12087 blades quite well.
Moving into the cowling area, we run into another couple of issues. The
oft-maligned cooling scoops are not one of them... yes, some were
staggered, while many others were straight in line. The kit gives a slight
stagger to these scoops... this existed on actual aircraft, so if you want to
change it feel free- but no one should smack you in the noggin with a
Klappenstutzen if you don't.
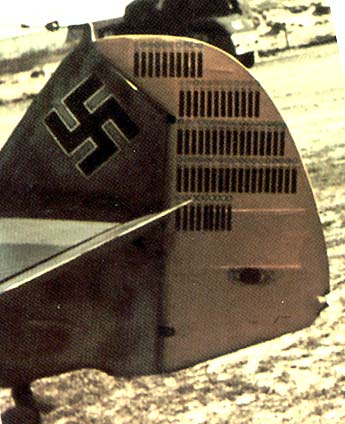
That bit aside, the biggest issues are the cowling panels
themselves... somehow, Trumpeter got the aft cut line all wrong and wound up
giving us panels whose lower edges remain on the fuselage halves. (see scans)
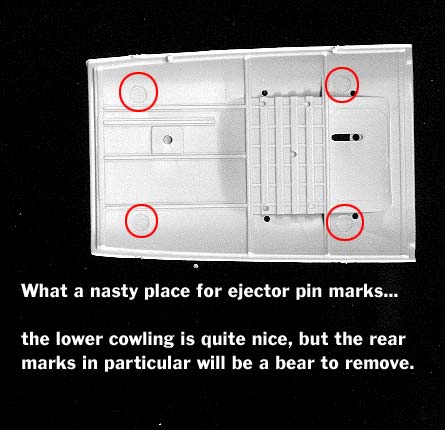
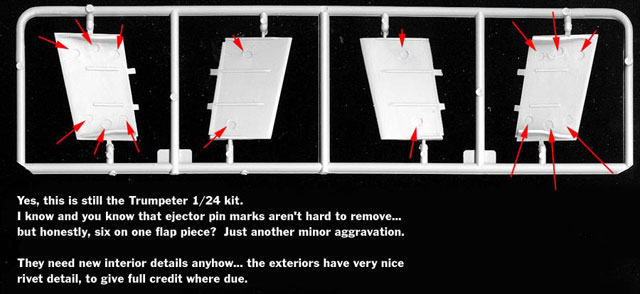
For those who intend to build their Gustav with the cowlings closed, this won't
be too big an issue. The cowling panel interiors have ejector pin mark issues as
well.
Click the thumbnail below to view
larger images:
To their credit, Trumpeter gives you the option to add the
"double bulge" on the starboard cowling, but to install it you must completely
remove the existing bulge. Maybe a bit of awkward engineering there, but at
least we have the option.
The gun troughs are of the earlier style, pressed directly into
the cowling panel itself as opposed to separate troughs welded into place.
However... for those who want to display the cowlings open, several nasty
surprises await.
The DB605A as given in the kit is reasonably well done. There
are three spurious circular plates on the top cover piece which don't exist on
the real thing, and the accessory section could use a bit more dressing up.
These are minor issues, however, when compared to the problems with the engine
bearers.
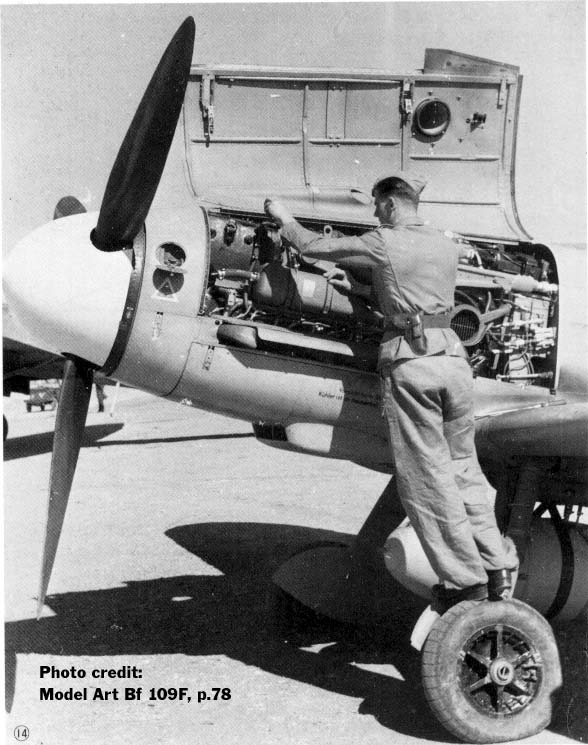
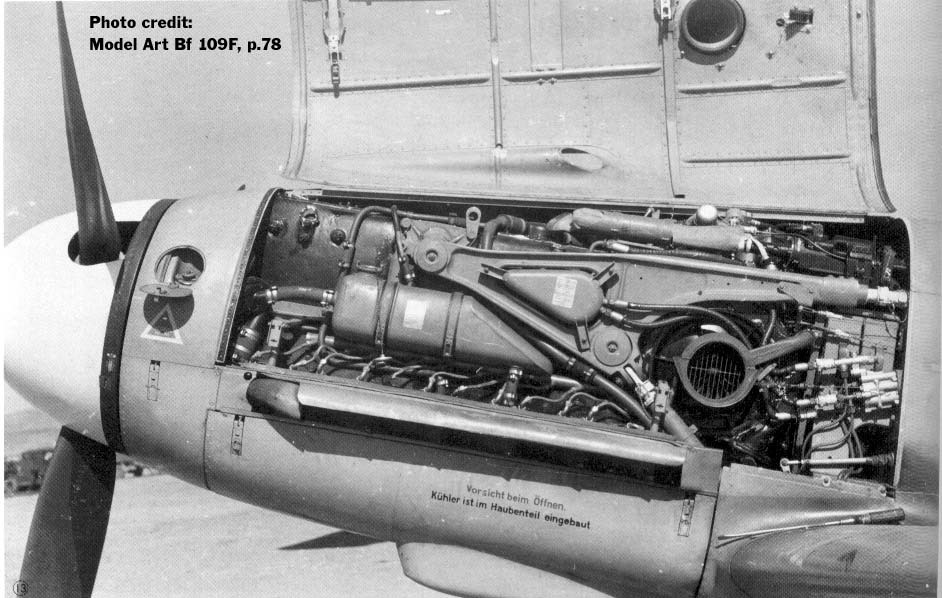
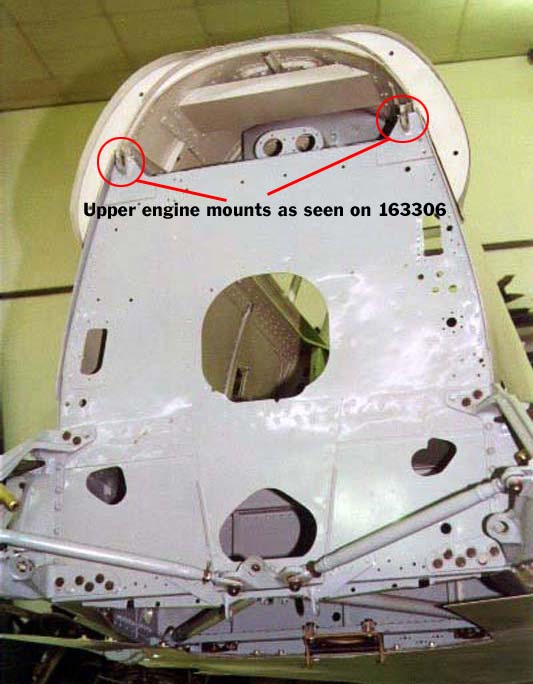
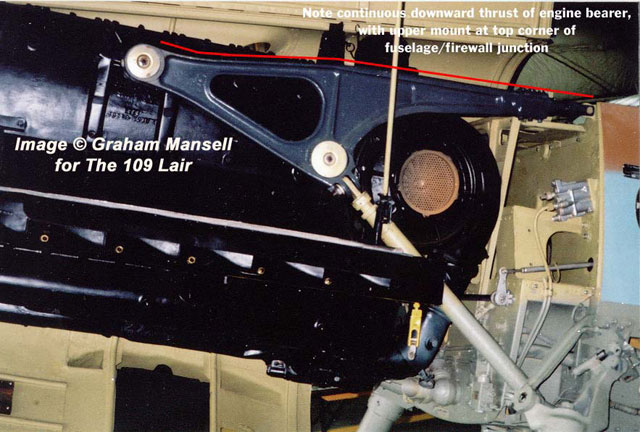
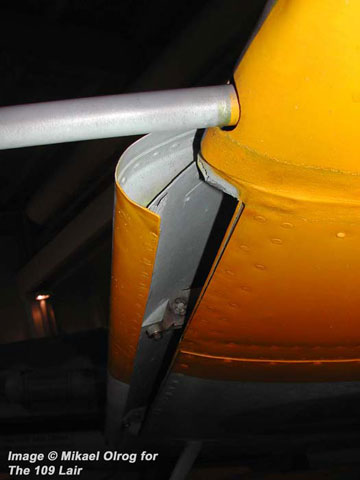
On a real 109, the upper engine bearers were mounted at the
upper corner junction of the firewall and fuselage decking which carried the
MG131s. This decking would be flush with the sides of the fuselage when the gun
cover was removed (see scans). However, for some reason Trumpeter places this
decking about 1/8" below the edges of the fuselage (presumably to make room for
the MG131s), and this wrecks the whole geometry of the engine bearers. As given
in the kit, rather than a gentle forward and downward slope from the firewall,
the bearers slope UP, then horizontal... it's very, very noticeable and those
people interested in building their Gustavs with exposed engines will want to
consider ways and means to rectify this issue. (see images below) I am working on just
such an approach, and will report on this as I progress with my build.
Click thumbnails below to view
larger images:
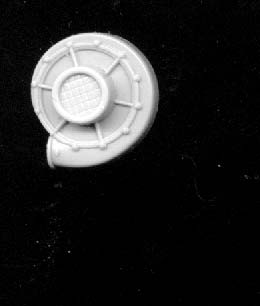 You will also want to drill out the center of the supercharger
intake, as the kit places a sunken waffle there, and at least add a piece of
screen if not a supercharger impeller. This may seem a minor detail,
but the supercharger is a pretty obvious focal point and extra time spent here
will certainly show. The kit gives rubber plug wires on a harness, which I'm
going to replace with copper or brass wire... there is PLENTY of room for superdetail aficionados to go nuts in the engine compartment. You will also want to drill out the center of the supercharger
intake, as the kit places a sunken waffle there, and at least add a piece of
screen if not a supercharger impeller. This may seem a minor detail,
but the supercharger is a pretty obvious focal point and extra time spent here
will certainly show. The kit gives rubber plug wires on a harness, which I'm
going to replace with copper or brass wire... there is PLENTY of room for superdetail aficionados to go nuts in the engine compartment.
It is odd that the main cowlings are given as open while the gun
hood is fixed closed... a razor saw would attend to that right smartly, however.
Another very puzzling omission is the complex fuel injection pump centered
between the cylinder banks beneath the engine... this was an inline unit with
twelve feed lines extending off the top to each cylinder, and the absence of
such a prominent part of the engine is puzzling, at best.
Other details such as the magneto, gun synchros, etc are basic
but decent, giving plenty of room for someone such as MDC's Vincent Kermorgant
to craft replacement items.
The guns themselves are reasonable, if simple, facsimiles of the
original articles... in assembling one, I've found the barrels to be somewhat
oval instead of round. There's a tremendous opportunity here for photoetch
cooling jackets... again, hint hint. Also, there is no, repeat, NO evidence of
the characteristic MG131 feed chutes anywhere to be found. It seems the design
department took a shortcut here and either made up some details, or tried
incorporating some MG17 bits from the G-2 for the feed mechanism... whatever the
situation, it ain't right. So add that to your list of things to do if you're
building this with the engine compartment exposed. (Skip if sealing the cowlings
shut... you won't see'em at that point).
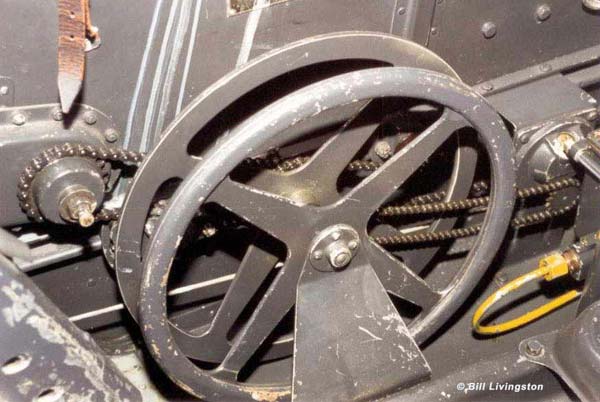
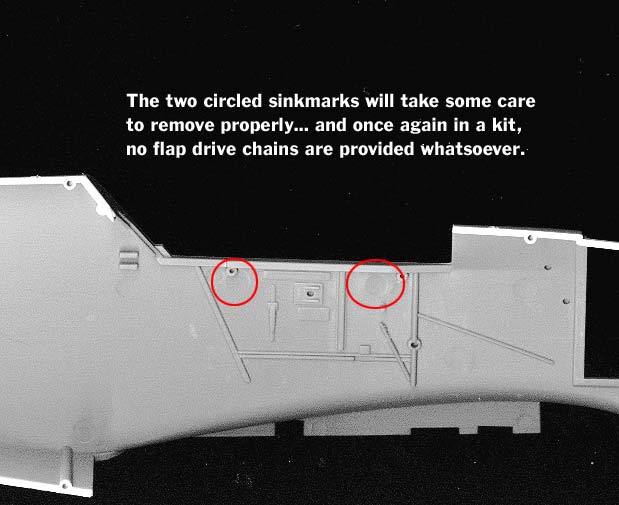
The cockpit is rather well done, with a number of welcome
features such as a multi-part throttle box, separate hood jettison mechanism and
ordnance drop handle, air inlet knobs, etc. However, there are still issues...
once again, there are no drive chains for the flap and trim wheels located to
port of the pilot's seat. The seat itself couldn't be any more basic, and could
stand to be thinner as well.
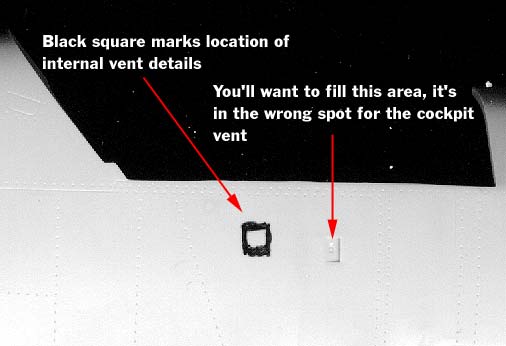
 While a separate fuel line is given (in grey plastic) for the
starboard wall, the characteristic wiring bundle that comes out of the fuse
panel just beneath the fuel line is not present. While a separate fuel line is given (in grey plastic) for the
starboard wall, the characteristic wiring bundle that comes out of the fuse
panel just beneath the fuel line is not present.
The modeler has the choice of a
Revi C12 or 16B gunsight. They're reasonably well done, if somewhat on the
simple side (one piece plastic molding for the body), with two separate glass
panes, and will certainly spruce up nicely.
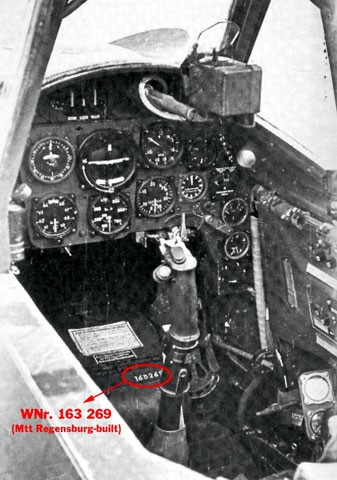
You'll need the 16B if you're
building Kühlein's bird. (see pic) The KG13A stick is a bit clunky but will
clean up very nice, and almost all of the various ancillary goodies (primer
pump, headset jack, O2 regulator and gauge cluster, etc) are accounted for.
(Note: the O2 flow valve is not included)
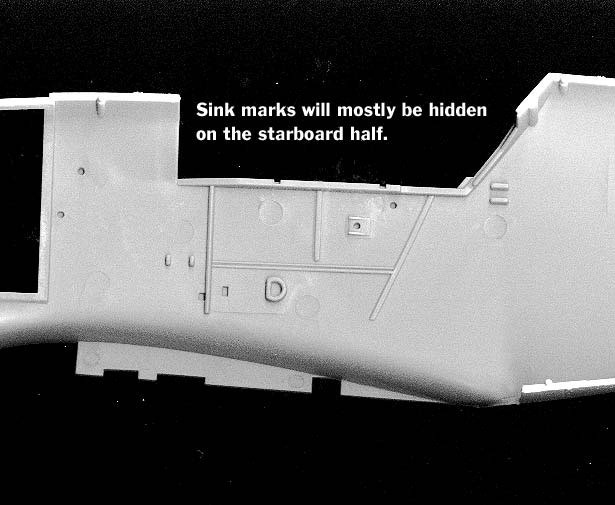
The floor is eaten up with ejector pin
marks, however, as is the back wall... you'll need to take extra time to clean
those up, as they'll be quite visible.
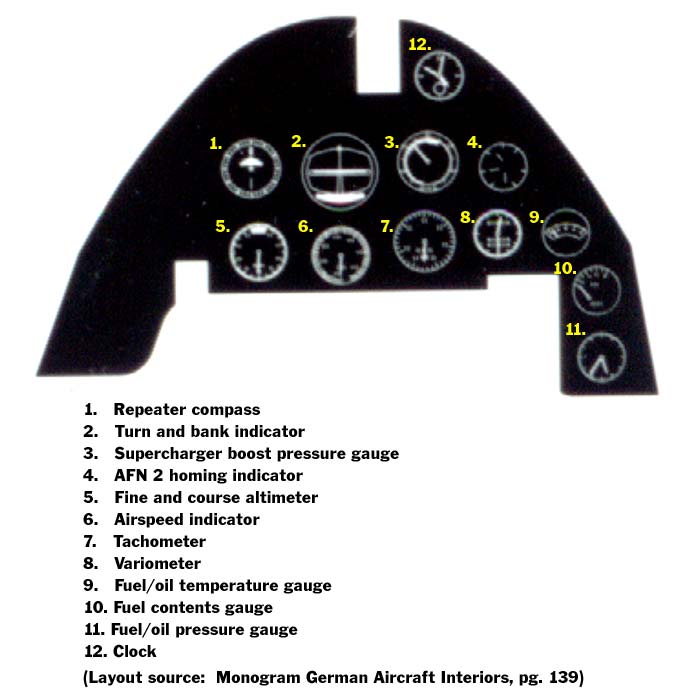
The instrument layout is dead accurate,
as shown by the accompanying scan, which is a relief. The omission of the
separate oxygen blinker and flow gauge faces is a bit of a letdown, but at least
they're given in their proper location.
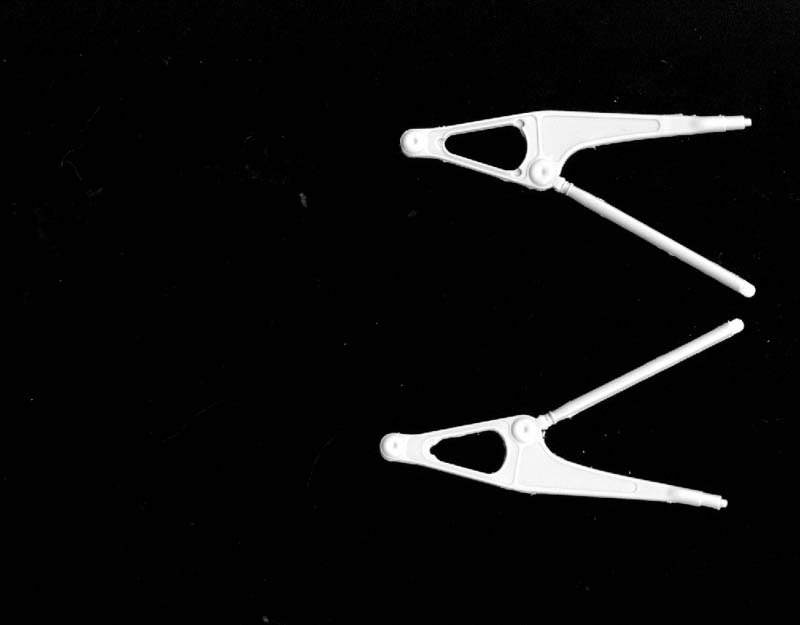
The rudder pedal mechanism needs to be noted here... at first glance, I thought
"Hurrah, finally we get these parts separate!" But no! Only HALF of the mounts
are given separate in the box, the other half is molded to the floor itself.
Grrrrrr.... why did they even bother? Oh well.
The pedals are just beautiful,
though, and some lead foil straps would set 'em off just right.
The kit also
gives you a basic centerline 20mm cannon which you can detail to your heart's
content if you so desire... but as with most other kits, the cover is too blocky
and needs to be sanded down and rounded off. No centerline weapons panel is
included in the kit, so if any manufacturer is planning on doing a Jabo or a WGr
21 conversion, you'll need to include this piece with that conversion set... for
I have decreed it to be thus...
Click thumbnails below to view
larger images:
There are a couple other odd omissions and errors as well.
Frst, as Brett
noted in his overview, the "Galland Panzer" is solid plastic. How the heck they
missed that, I have no idea. It shouldn't be too hard to drill out and fix, and
there is ample clear plastic included in that "visible fuselage" tree to provide
a suitable chunk to add the armor glass. You'll also need to add the various
bolts and brackets which hold it in the hood.
Second, even though this is billed
as an "early Gustav", there's no early head armor. And third, for a kit
retailing over $100.00, the complete omission of any sort of seat belt hardware
(even molded on plastic ones) is absolutely absurd. This may seem overly harsh,
but considering that 1/48 kits costing about a quarter of this one have such
details included, I do not think this is an unreasonable expectation.
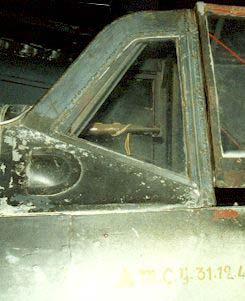 Well... first of all, either the windscreen is a bit too short
in length, or there's something amiss with the framing itself (see image at
left). I
haven't quite sorted out which is the case- but the good news is that the kit
comes with two full sets of clear parts. Well, mine did anyway. Well... first of all, either the windscreen is a bit too short
in length, or there's something amiss with the framing itself (see image at
left). I
haven't quite sorted out which is the case- but the good news is that the kit
comes with two full sets of clear parts. Well, mine did anyway.
Following the theme of the kit so far, the hood is nicely done
but basic... I intend to remove the forward windows and pose them slightly open,
just because I can.
The canopy latching handle is included in the kit, and is very
well done... another little burst of inspiration from the designers.
The aftmost canopy portion lacks only the upper central internal
support, but this can be added from a piece of strip styrene. There are no
further details... no hood jettison equipment or any of that. Oh, and before
anyone asks, yes, these canopies suffer from the same slight "crazing" that most
other Trumpeter kits have, primarily on the central hood. This apparently comes
from removing the plastic from the mold too quickly... whatever it is, it's
irritating but not fatal.
Once again, though, one would expect a bit more for the MSRP.
Is this the Hasegawa 1/32 kit scaled up? One could be forgiven
for thinking so, given the surprising lack of internal details in the wing
assembly.
The gear bays give you no more than any other 109 kit... a simple wall
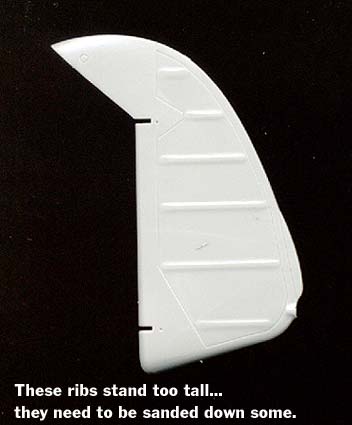
around the circumference, the characteristic four dimples in the leg trough
(which YOU get to drill out...), the raised ribbing detail on the upper wing,
and that's it. This is a huge missed opportunity, but will no doubt be accounted
for by enterprising aftermarket manufacturers with photoetch wheel well liners (do'em
in ALL scales, people, we need'em), etc. And just like the Hasegawa kits, the
upper "bulges" mount via two pins which project into the well... sure, it can be
taken care of, but c'mon. That's an engineering cop out.
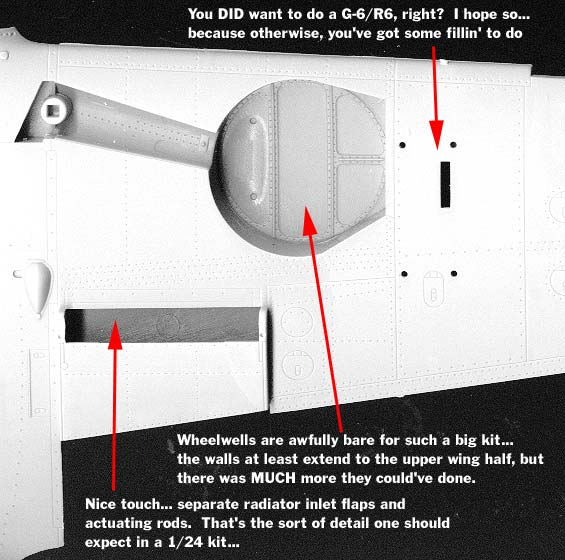
Trumpeter does show
flashes of inspiration here; for the first time, we have separate radiator inlet
doors with actuating rods. They're quite nice, and unfortunately, that's the
extent of the "superdetailing" provided... the "gator" flaps suffer from severe
ejection pin marring (more sanding and putty), and there is no semblance of any
flap hinge mechanism, a fairly obvious omission in this scale. Again, a
photoetch set would be ideal to dress this area up... hint, hint.
The ailerons share an unusual (and wrong) surface texture with the rudder and
elevators, and will definitely require sanding to bring the surface back to
reflect some sort of reality. Also, the ailerons and midwing flaps are all
hinged... separately. Naturally, I am opting to cement these in place;
otherwise, these multiple movable control surfaces would tend to flap about like
some medieval orninthopter, a decidedly unattractive display option for this big
beast.
It should be noted at this point that Trumpeter presumes the modeler will be
constructing an R6 variant (with the 20mm underwing cannons)... the holes for
the underwing pods are already open, and in one of more bizzare features I've
seen on a kit, the ammo drums and feed chutes are provided for the 20mm cannons,
although both are fully tucked away within the wing and thus completely
invisible. The inclusion of this detail really left me wondering what was going
on in the design department, especially given that the cowl 13mms feature NO
semblance of feed chutes, proper mountings, etc... it's just weird.
 At any rate,
the cannons and pods are nicely rendered, and will benefit from a little careful
cleanup. If you want to do a bird without the guns, it shouldn't be that big a
deal to plug the holes using scrap plastic, sprue, wadded-up grass, old chewing
gum, etc... it would've been preferable to see the kit in a "clean"
configuration with the holes flashed over, but that's a minor point at best.
Anyone with basic modeling skills can address this. At any rate,
the cannons and pods are nicely rendered, and will benefit from a little careful
cleanup. If you want to do a bird without the guns, it shouldn't be that big a
deal to plug the holes using scrap plastic, sprue, wadded-up grass, old chewing
gum, etc... it would've been preferable to see the kit in a "clean"
configuration with the holes flashed over, but that's a minor point at best.
Anyone with basic modeling skills can address this.
Also, the slats are correct,
if basic, and will look a LOT better with some extra detailing. The wingtip
light covers are included in clear (as they should be), but they need to have a
little hole drilled on the inside of each one and a drop of red (port) and dk
blue (starboard) added to simulate the bulbs. Very quick, very simple, and very
effective.
|
 Home |
What's New |
Features |
Gallery |
Reviews |
Reference |
Forum |
Search
Home |
What's New |
Features |
Gallery |
Reviews |
Reference |
Forum |
Search